The Project
Something that I’ve been wanting to do for a while is get a second permanent antenna setup. Currently, my only permanent antenna is an 80-10m EFHW. Having a second setup would allow me to operate more than one radio at a time during contests.
A bonus to this new antenna setup would be to make it rotatable. The EFHW is fixed, so it gets better propagation in some directions and worse in others.
So here is what I came up with:
- Install aluminum tripod on roof
- Place a rotator on top of an 8ft mast
- Install a directional antenna on the rotator.
For the antenna, I considered a few options.
- Option 1: Multi-band or Mono-Band Yagi
- I did not trust the tripod/rotator and an 8ft mast to be able to sufficiently support a large yagi.
- Option 2: Rotatable Multi-band Delta Loop
- This at first seemed like a great solution, however I found that a wide range tuner is needed to operate these on multiple bands. I wanted to be able to just use the tuner built-in to my FT-710.
- Option 3: Mono-band Rigid Dipole
- This is the antenna I ended up deciding on. DIEX antennas makes rigid shortened mono-band dipoles that are rotatable. I chose the 20m version, as I found that over 80% of my contacts logged on LotW/QRZ are on 20m. The wind loading area is also very small.
Below is a sketch of my plan:
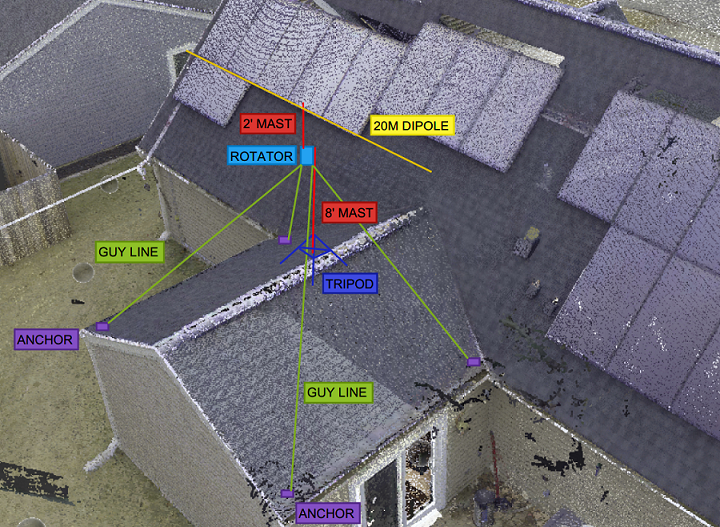
Installing the Tripod
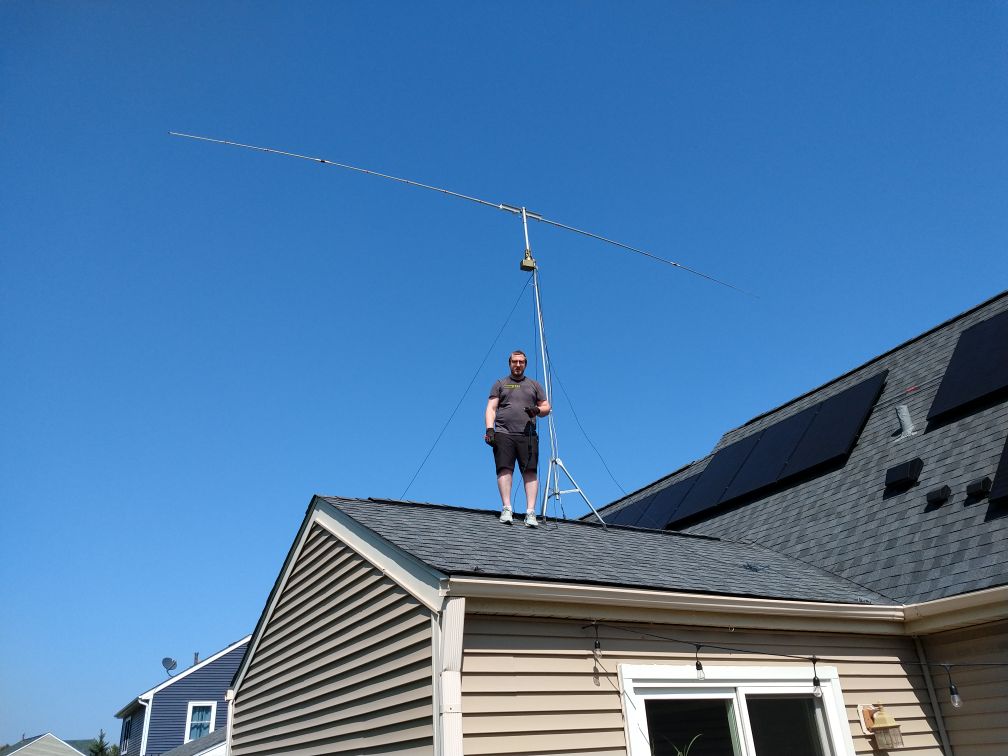
My house has a sloped shingled roof. I decided to install the tripod on a lower part of my roof and use a long mast to clear the higher part. This lower part of my roof is much less steep, so I felt much more comfortable walking around on it there.
First, I brought the tripod onto the roof, leveled it with the mast installed, and marked out where the holes would go. I used pitch pads and lag screws to secure the tripod into the plywood decking underneath. I made sure to miss the trusses on all 3 feet, as there was no configuration where all of the feet would hit.
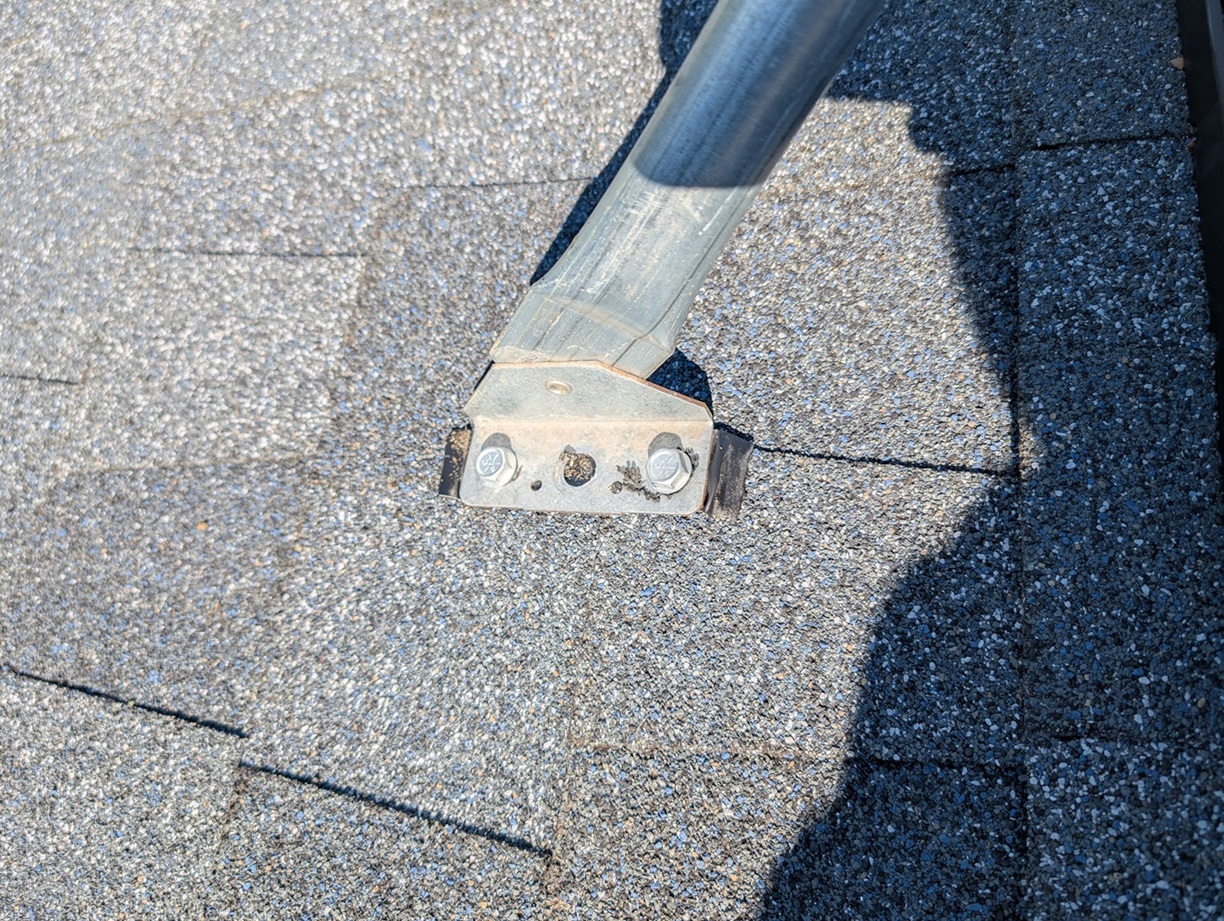

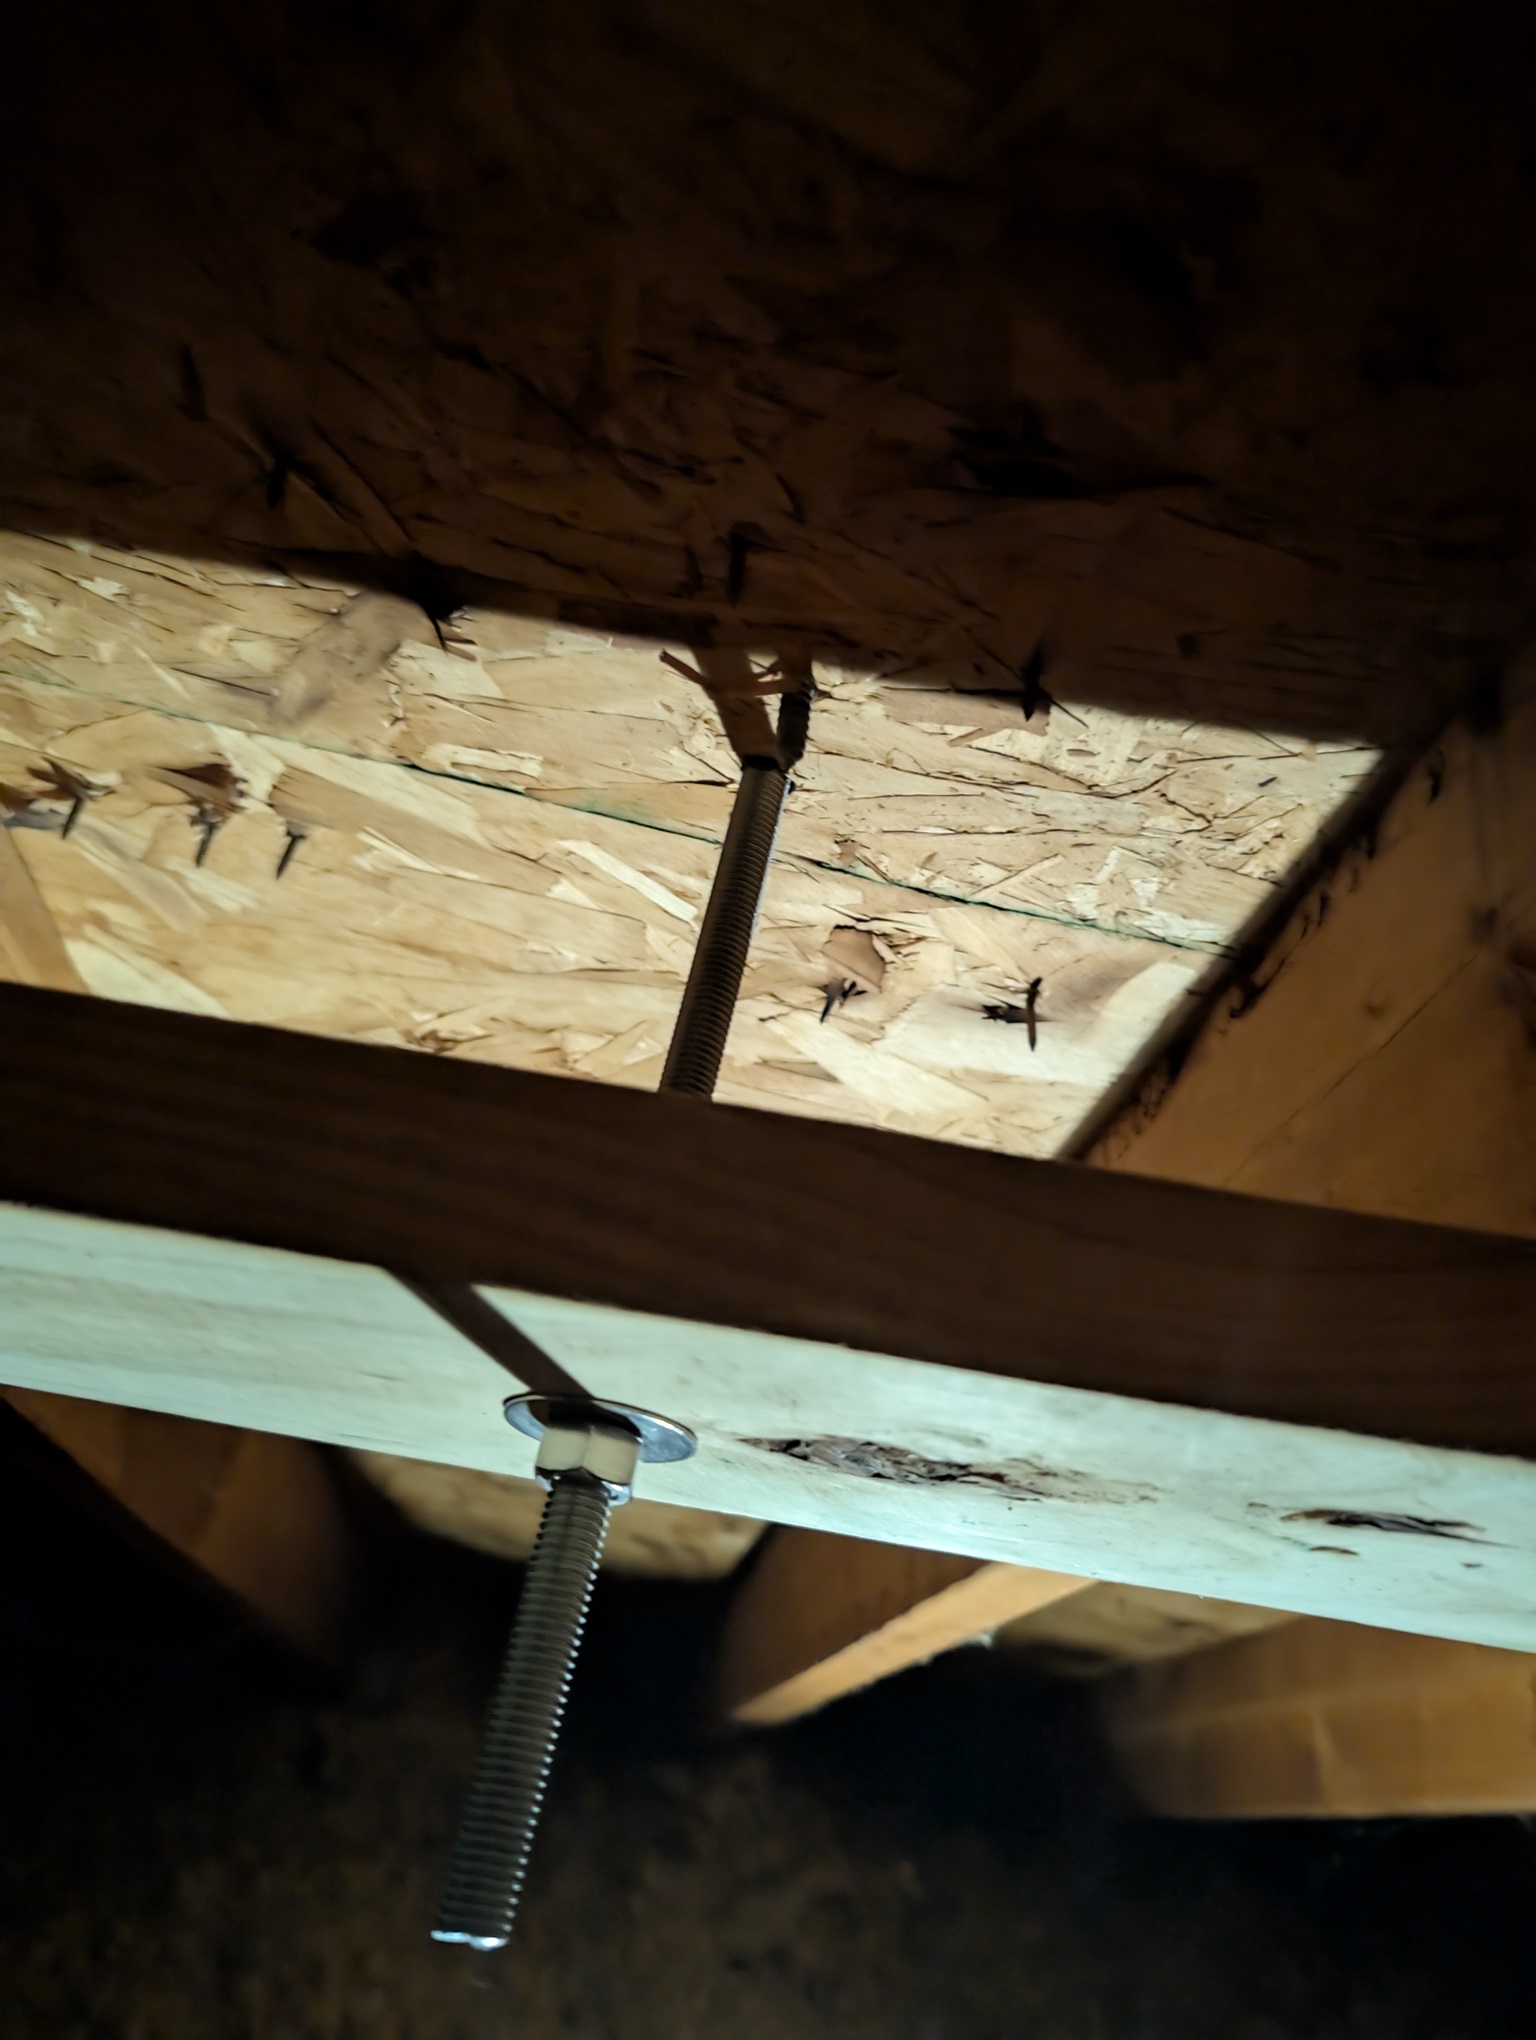
Next, I drilled 1/2″ holes through the shingles and decking. I inserted a 12″ length of threaded rod (1/2″ x 13 TPI) through the feet and the holes. Nuts were fastened to the top part of the threaded rod. I used sealer under the nut to try and fill the holes while inserting the rods.
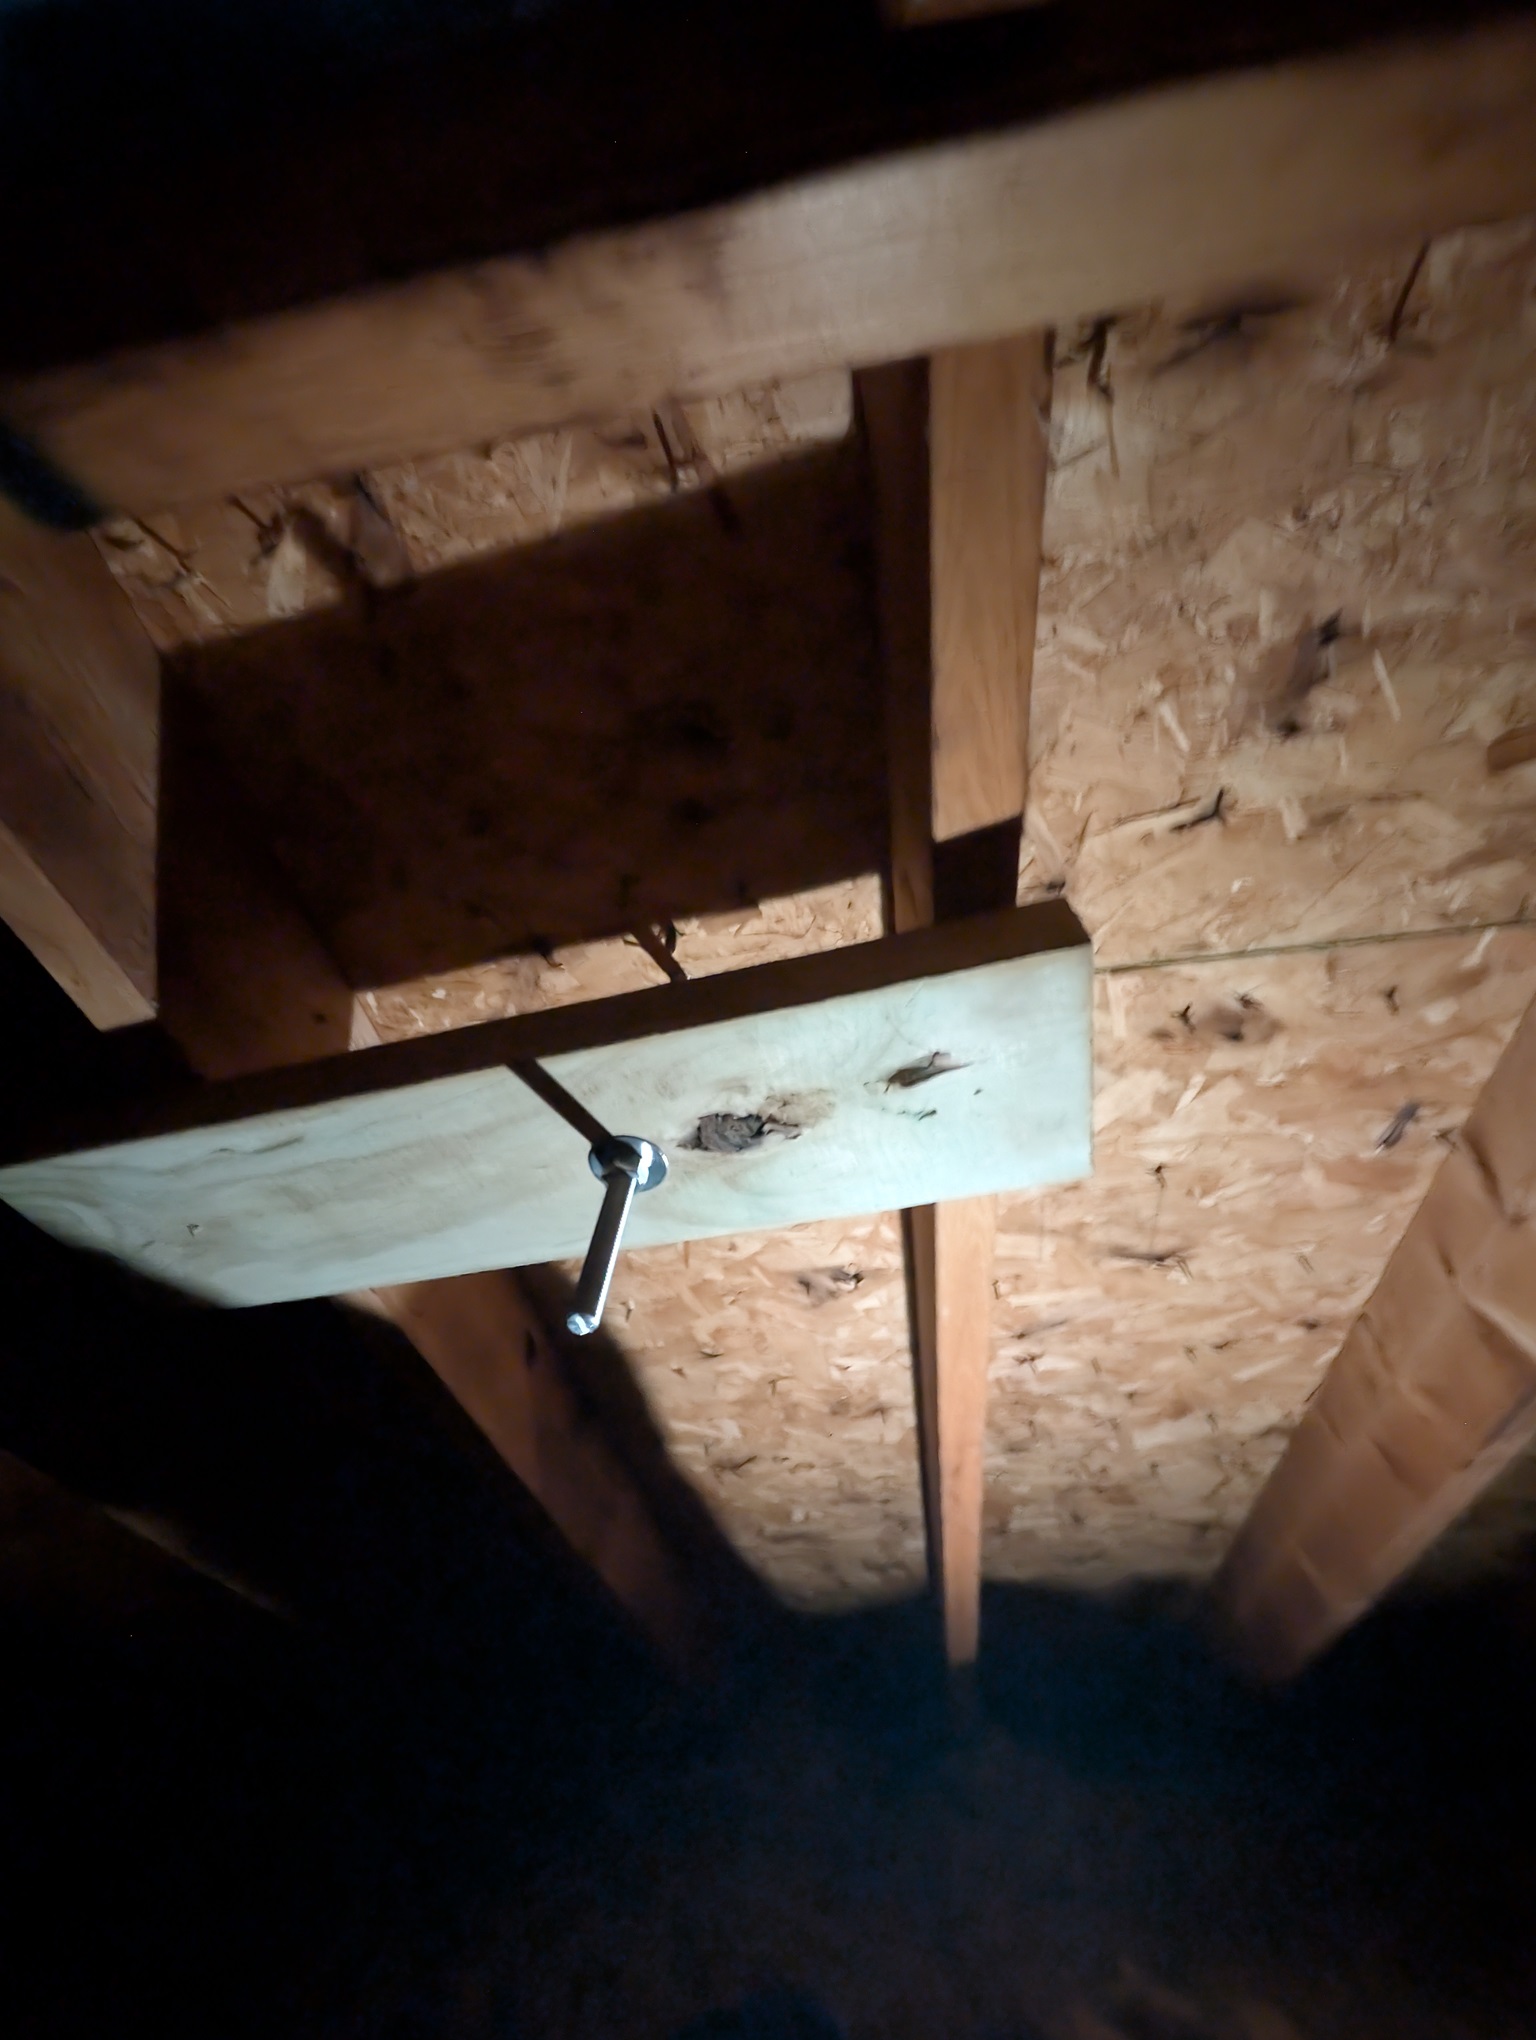
I then moved into the attic below. I cut stringers out of 2×6 boards to span the nearest trusses. The 12″ threaded rod was enough to clear the rafters (see photo below). I secured the stringer boards to the rafters with a few screws just to keep it in place, and then placed a fender washer and a nut on the back side. I then tightened the nuts with a wrench. I also created a CAD drawing showing the arrangement.

Now back to the roof. I inspected the feet to make sure that they were completely secure and that there was squeeze-out from the pitch pads and sealant.
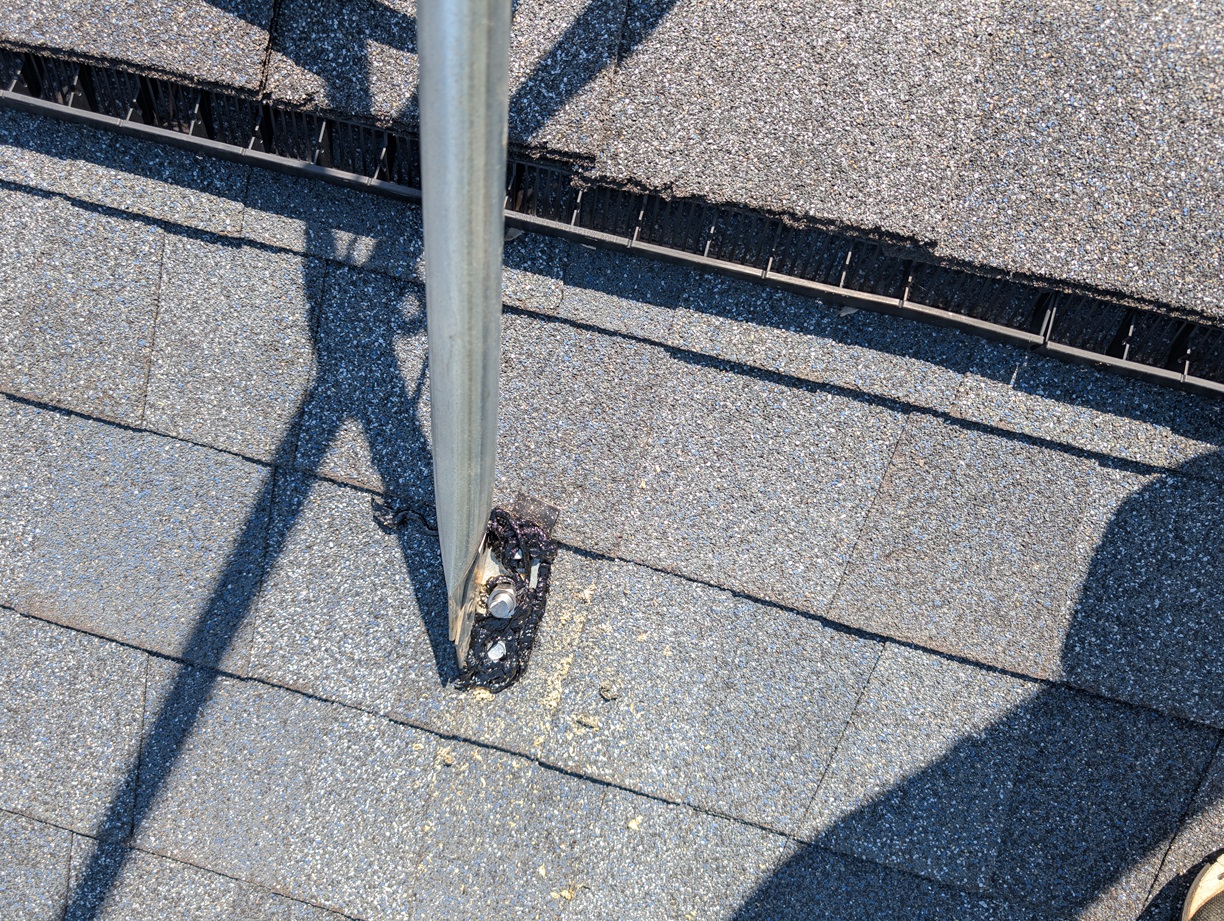
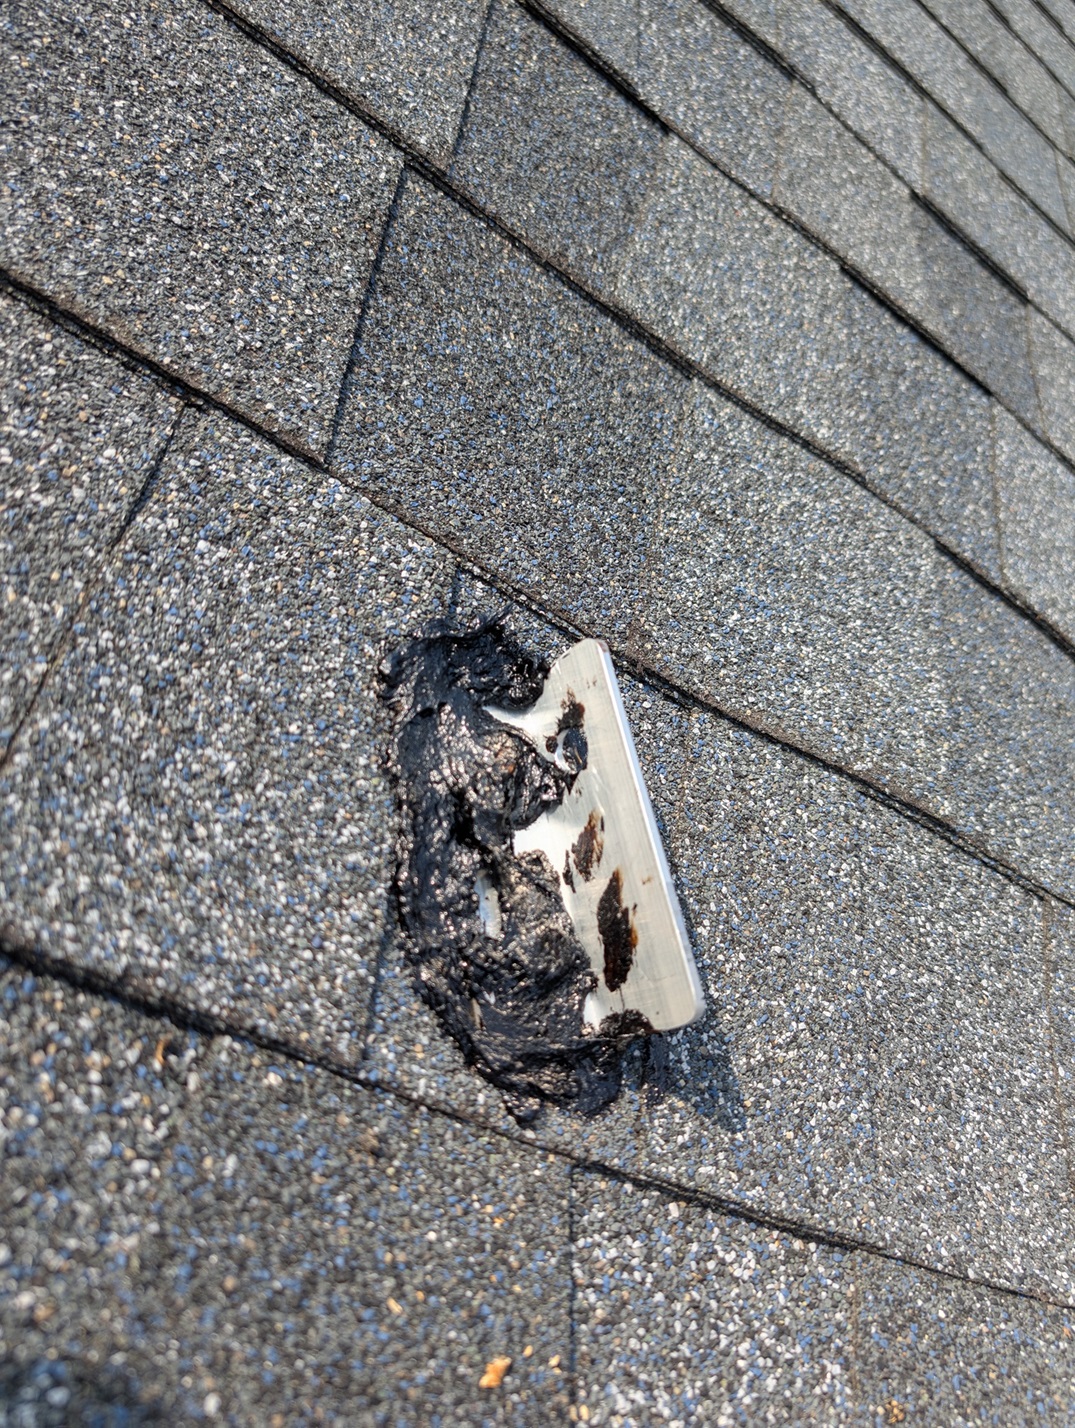
To fully seal the feet, I covered the connection points with a tube of roof sealant. I made sure to get under and around the nut and bolt heads, and around the entire perimeter of the feet. I smoothed out the sealant with a gloved finger. It rained hard the very next day, and there was no leakage.
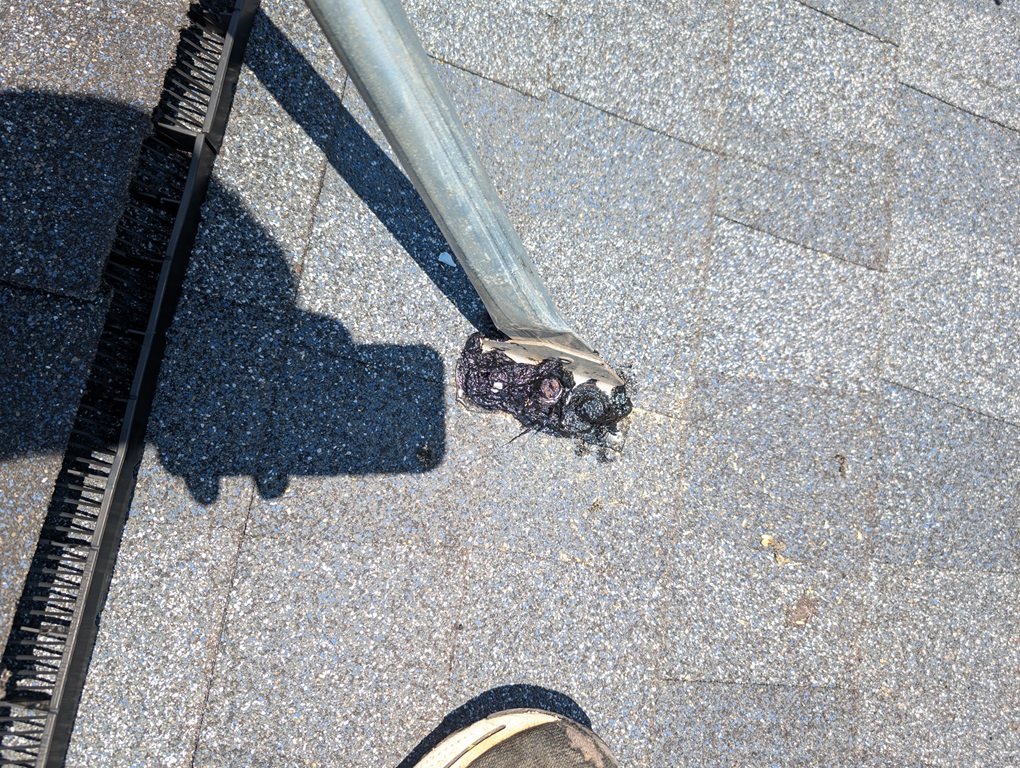
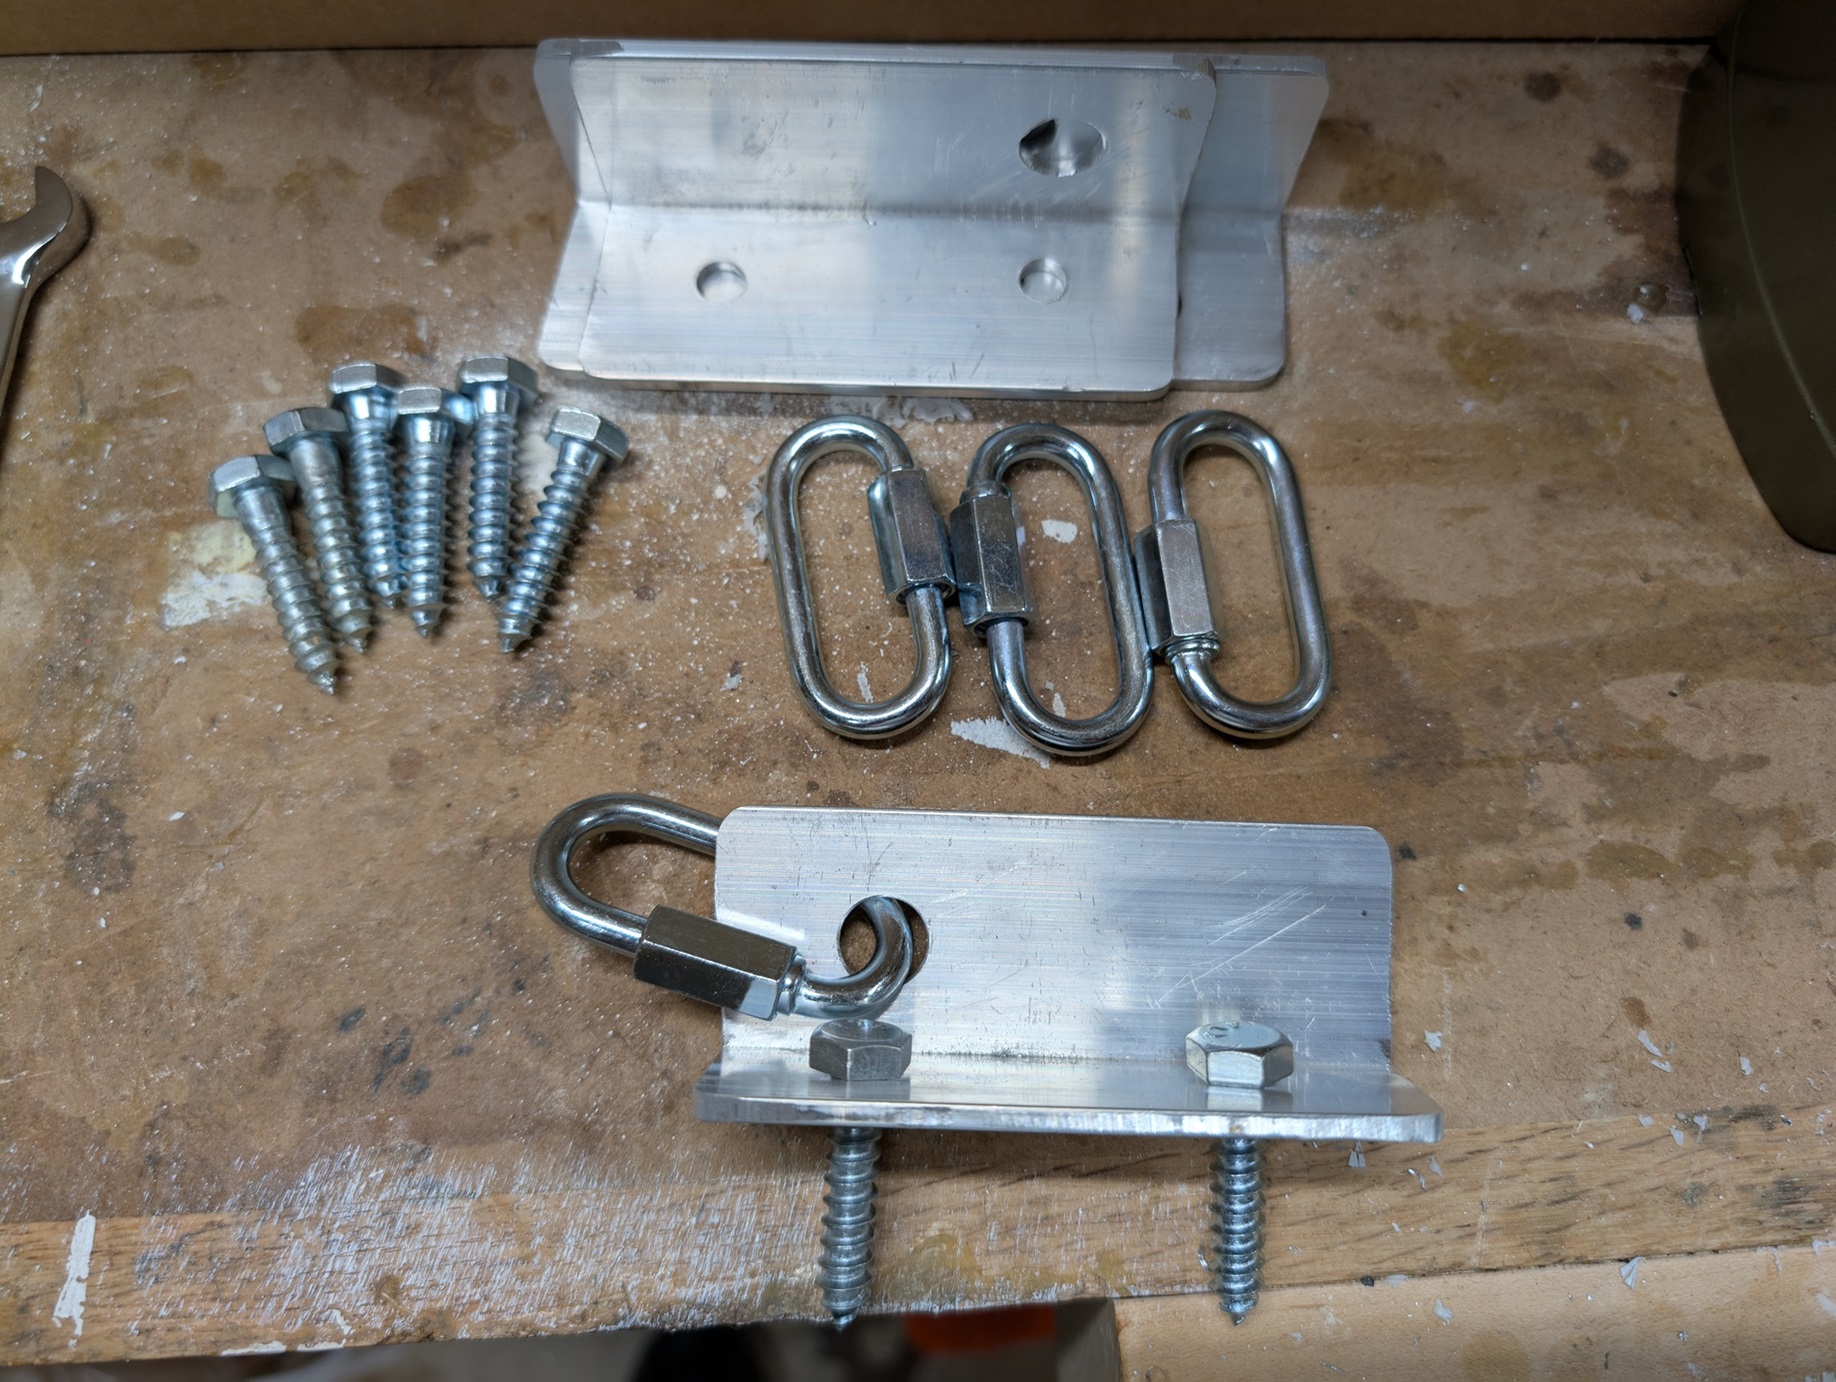
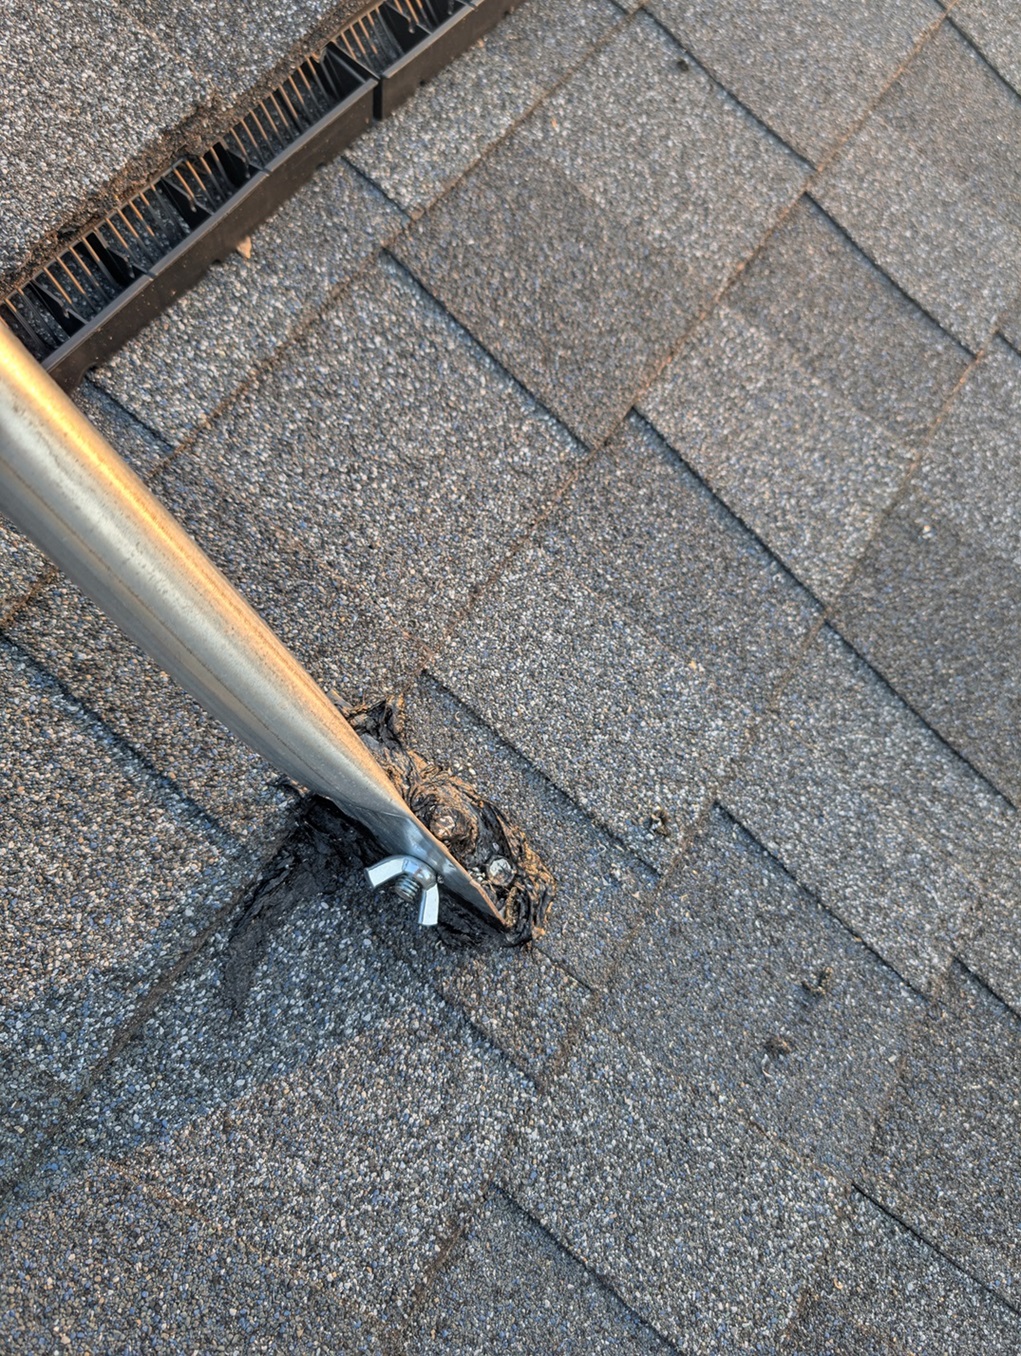
I also fabricated and installed 4 aluminum guy wire brackets with lag screws and plenty of sealant. These brackets were made from aluminum angle and secured with lag screws through the decking.
Finally, I made one last modification. I drilled out the rivet on one of the tripod feet and replaced it with a 3/8″ bolt & wing nut. This will allow me to tilt the tripod down while installing the mast and antenna.
The Rotator
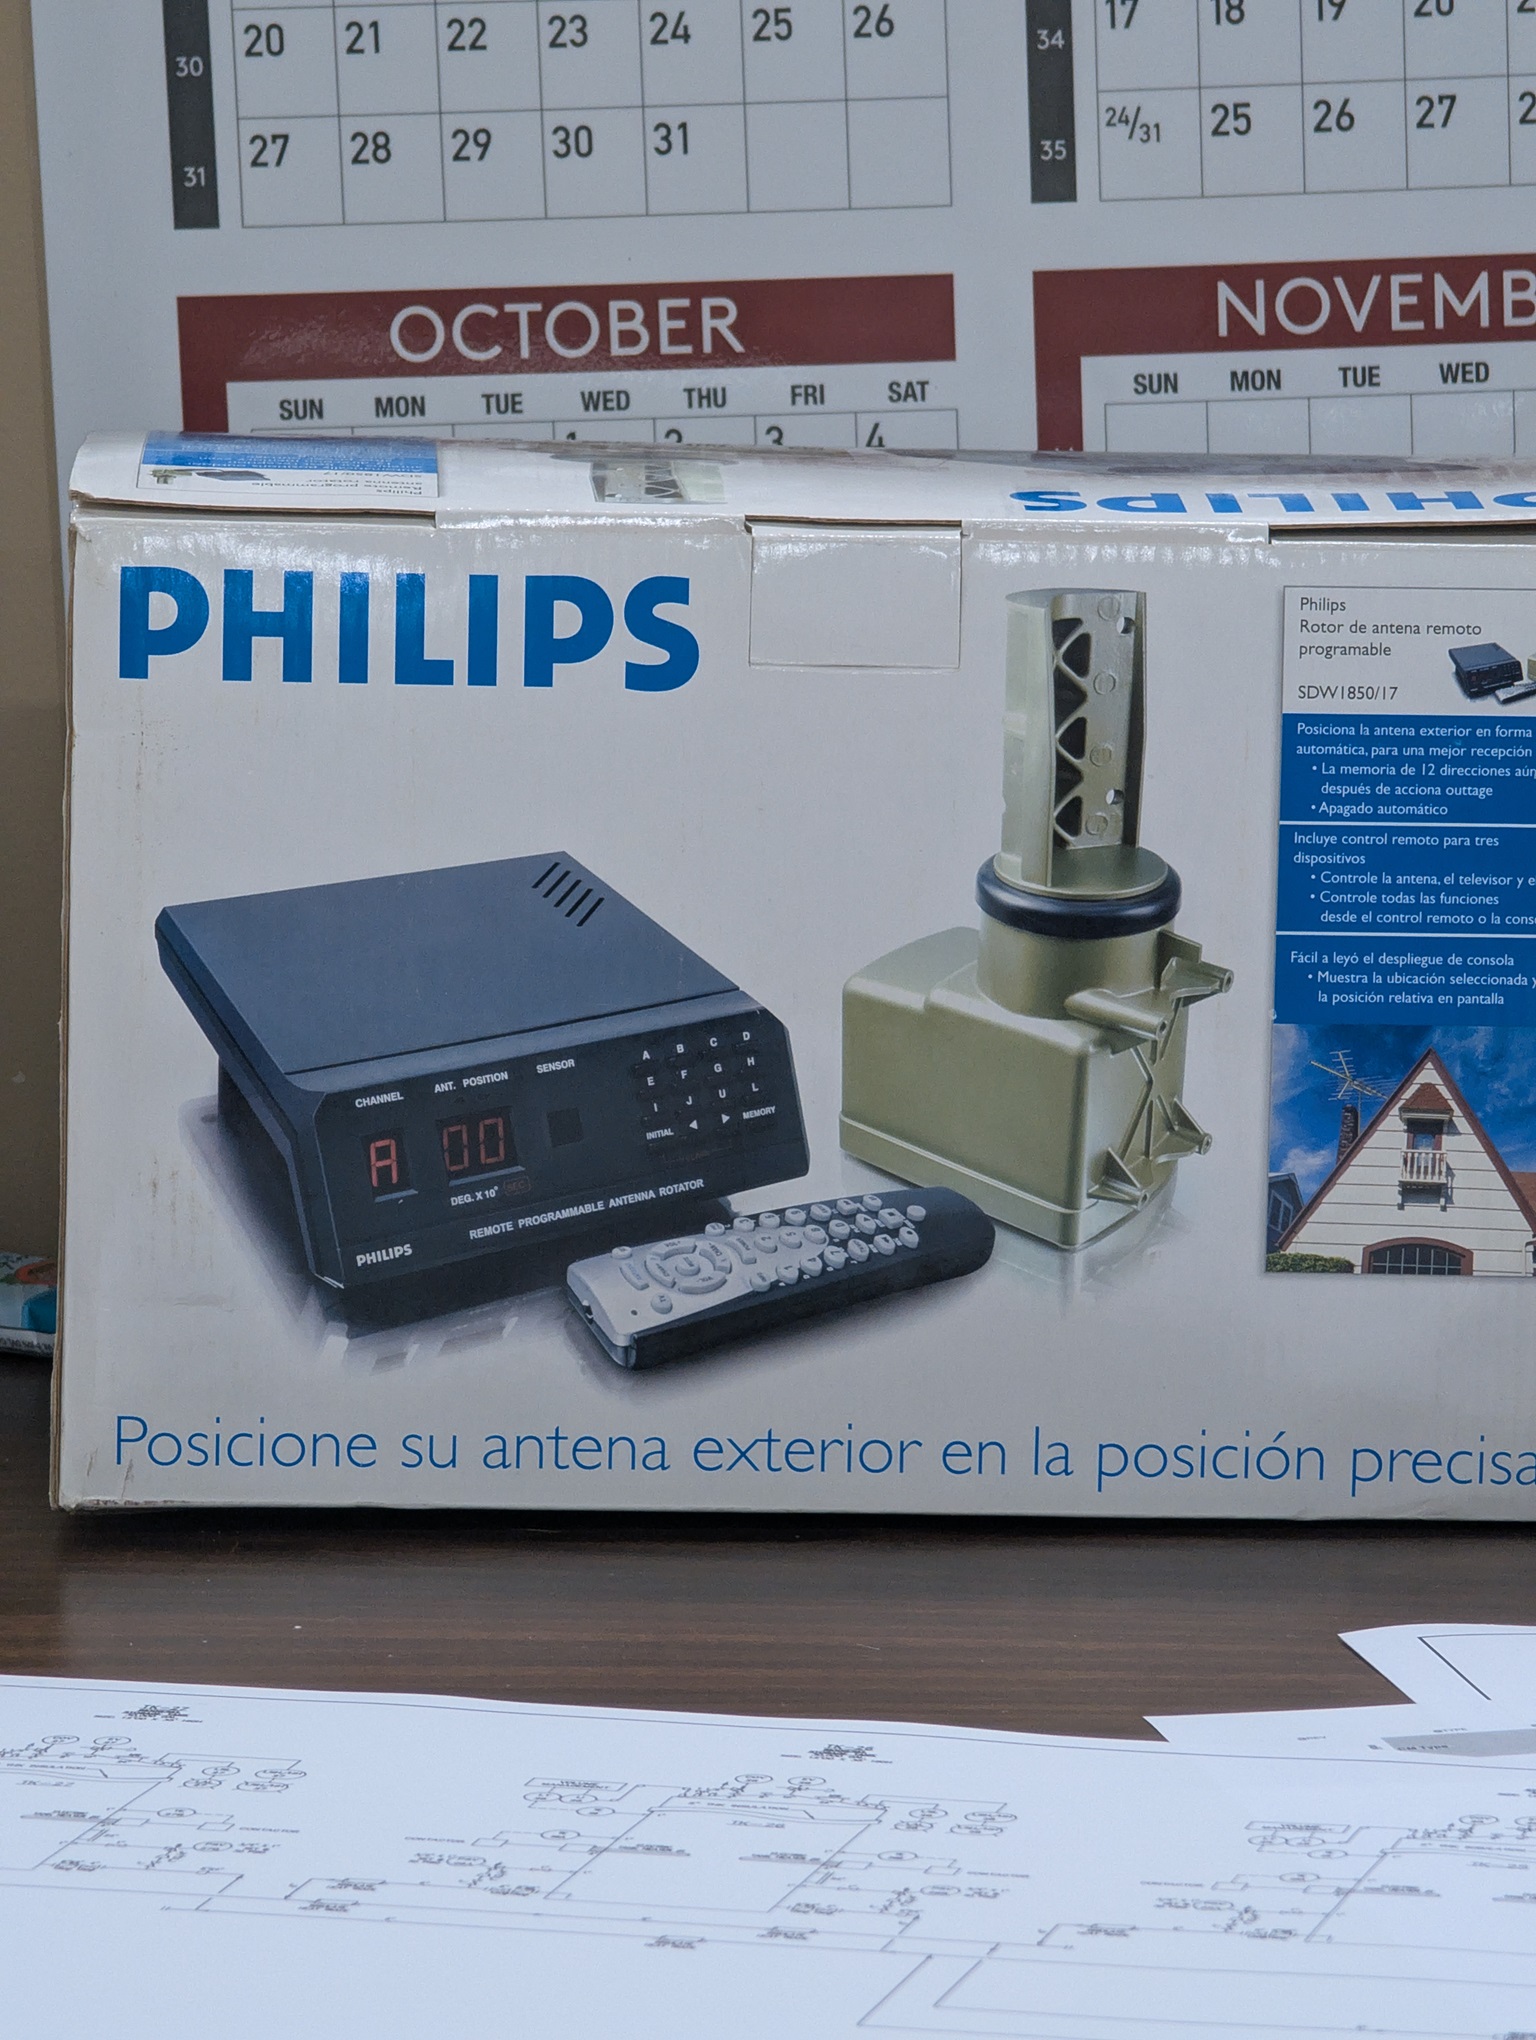
I was able to obtain an antenna rotator from a coworker. He purchased the rotator almost 20 years ago with the intention of putting his TV antenna on it, but never actually took it out of the box. He sold it to me on the cheap (the rotator and controller look brand new, and the manufacture date is Feb 2007.) This Philips model is identical to the popular Hy-Gain AR-500.
The rotator instructions gave recommendations on the mast length above the rotator based on the size of antenna. Considering the wind load area (1.29 sqft) and weight (7.3 lbs) for the rigid dipole, and some safety factor, I decided that this was a “large” antenna.
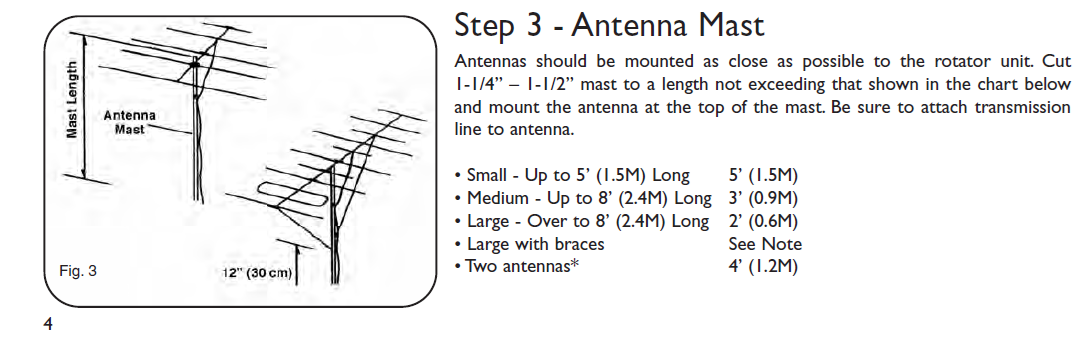
This led me to chose a 2ft long mast. with the 10ft main mast and the 2ft antenna mast, this put the antenna above the roof line on the taller part of my house.
I used some plenum/outdoor rated 3 conductor 18 AWG shielded security system cable for the rotator controller (the rotator manufacturer recommends at least 20 AWG). I ran about 50ft from the rotator to the controller inside the shack.
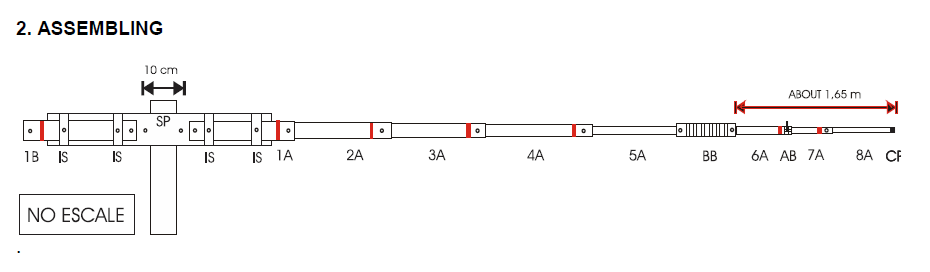
Assembling the Antenna
The antenna came securely packed from DX Engineering. All parts were neatly labeled.
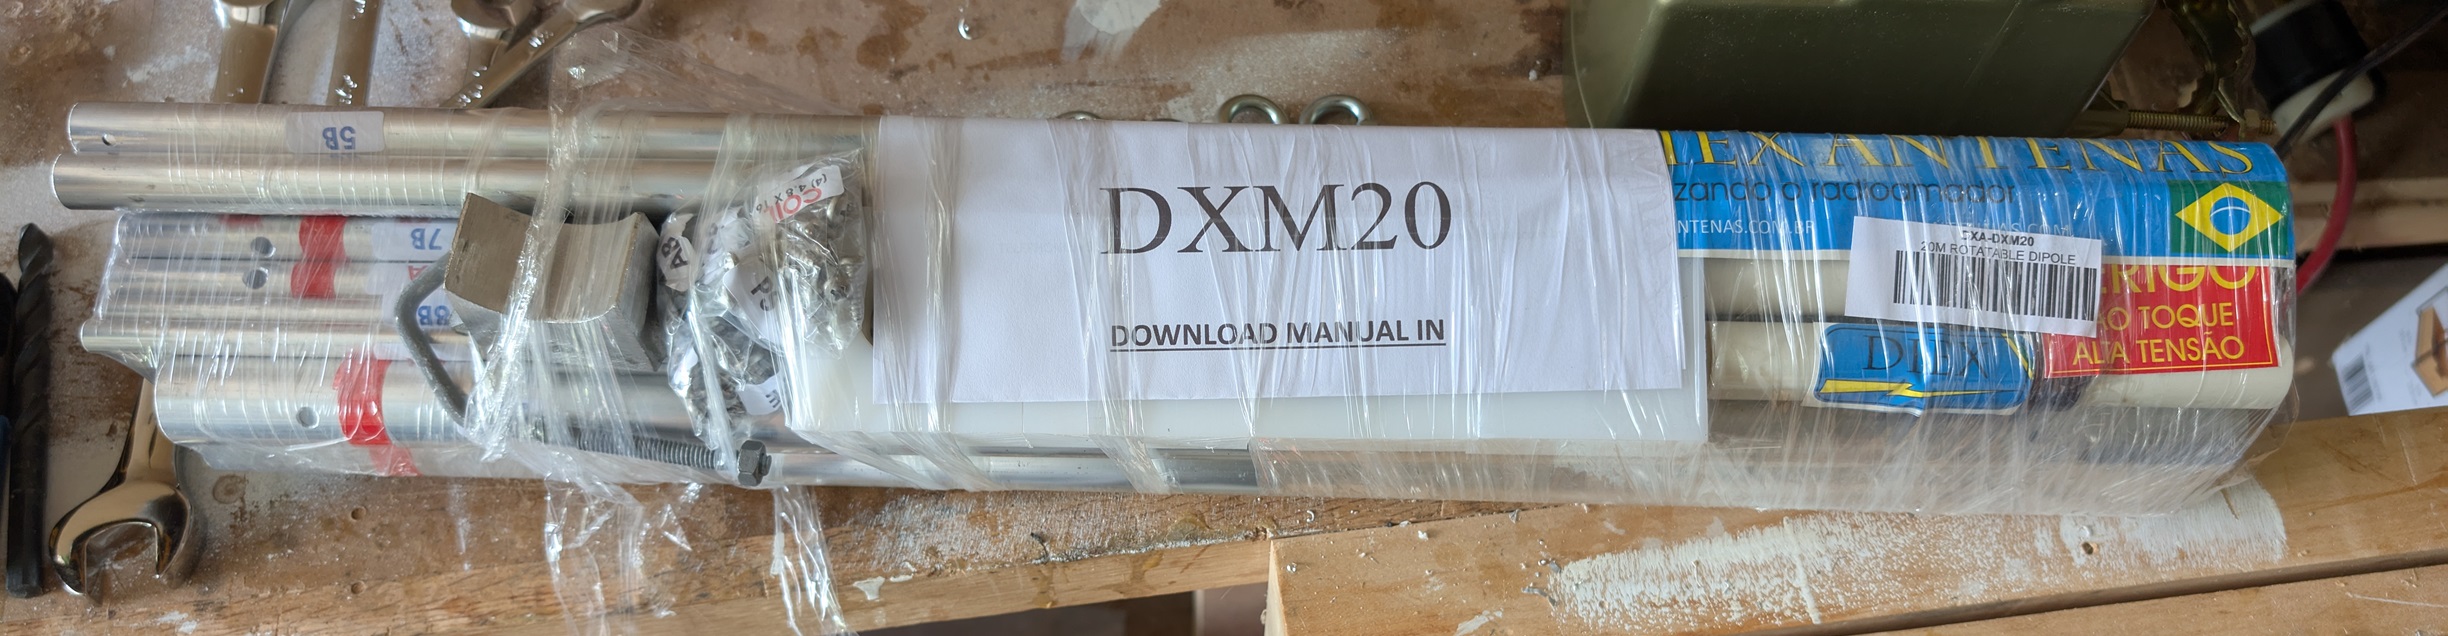
The assembly instructions were clear, so putting the antenna together was relatively straight forward. For the mast, I purchased a 10ft section of 1-3/8″ chain link fence top rail and a 6ft section of 1-5/8″ chain link fence post. I used the 10ft section as the lower mast, and then cut a 2ft section of the fence post to use as the upper mast.
Preparing for Antenna Installation
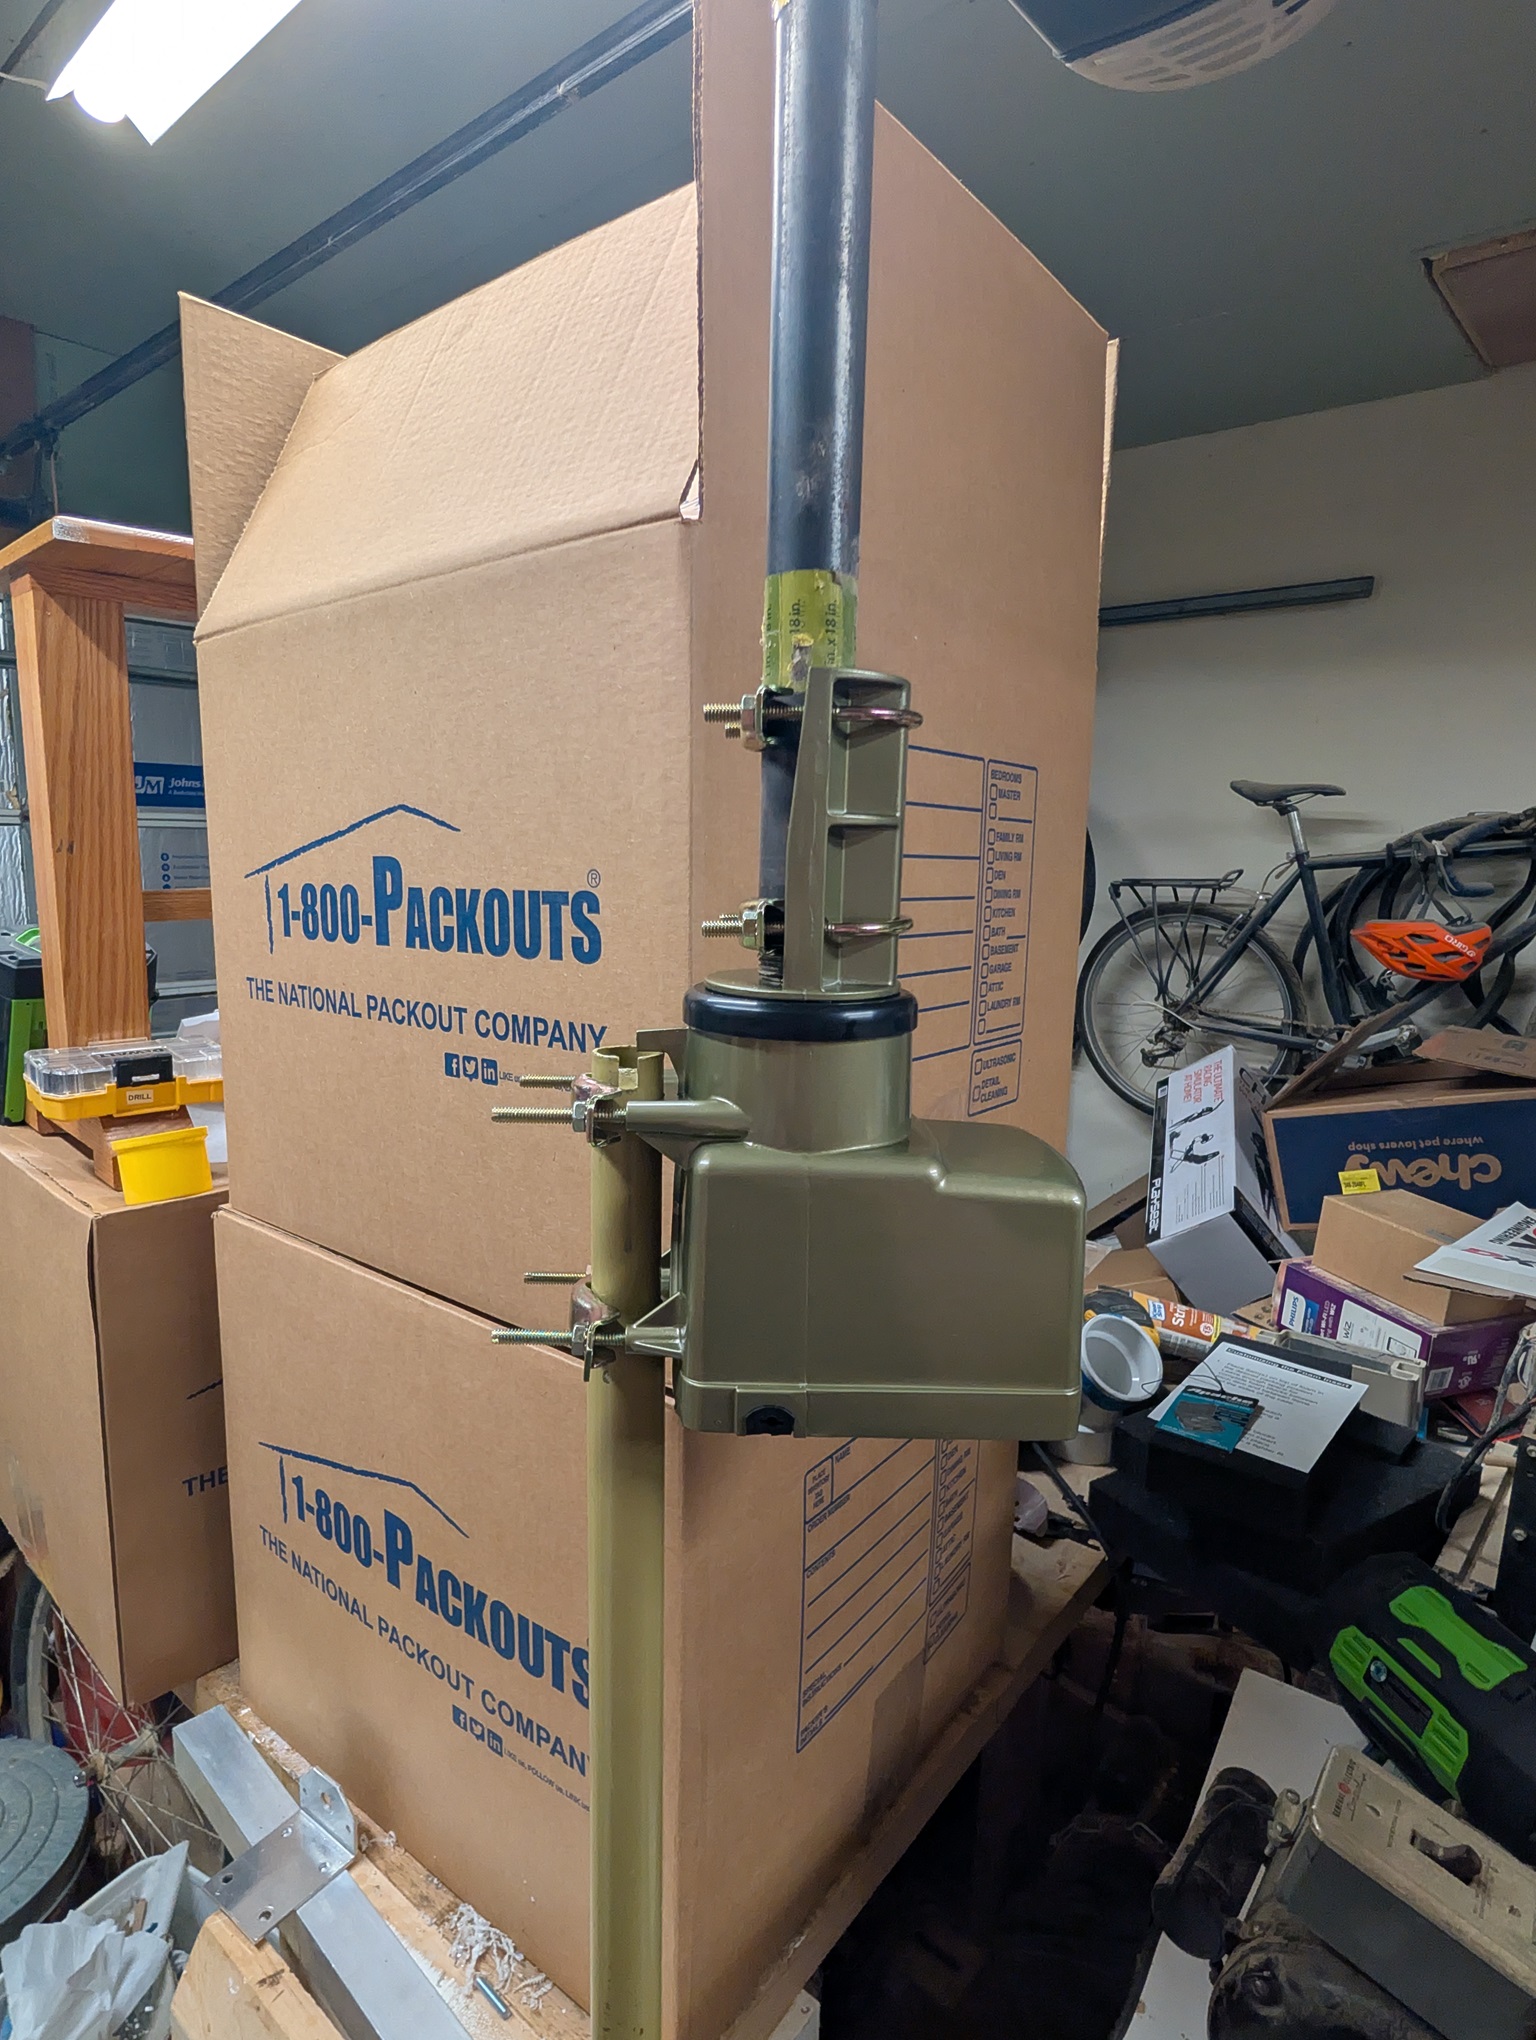
First, I laid out the masts, rotator, and antenna in the yard. I fixed the rotator to the top of the 10ft mast, then the 2 ft mast on top of the rotator, and finally the antenna to the top of the 2ft mast. I also covered the PVC coils in electrical tape to protect from the sun.
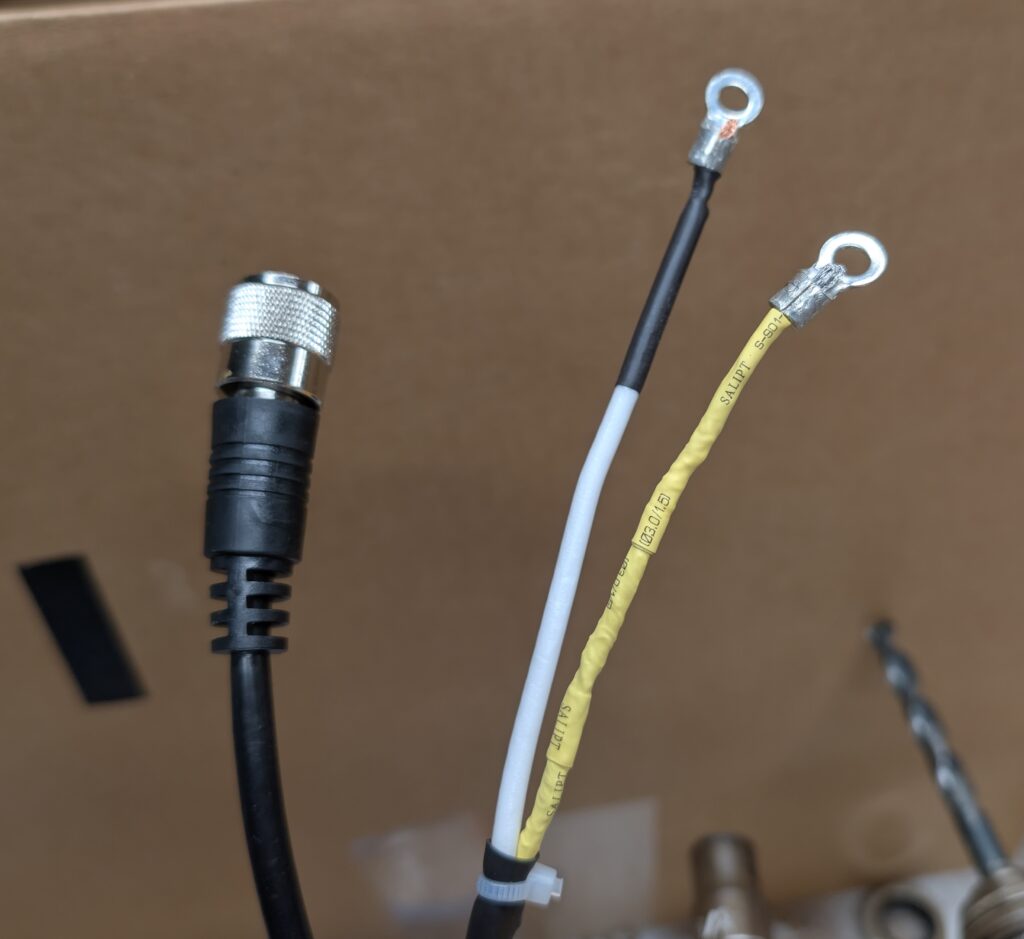
With this pre-assembled, I wired the rotator and ran the feed line for the antenna. I removed the connector off one end of a 10ft long feed line and crimped the supplied ring terminals to the shielding and core of the coax. I installed a choke on the mast with plenty of slack above it to allow the antenna to rotate all the way around.
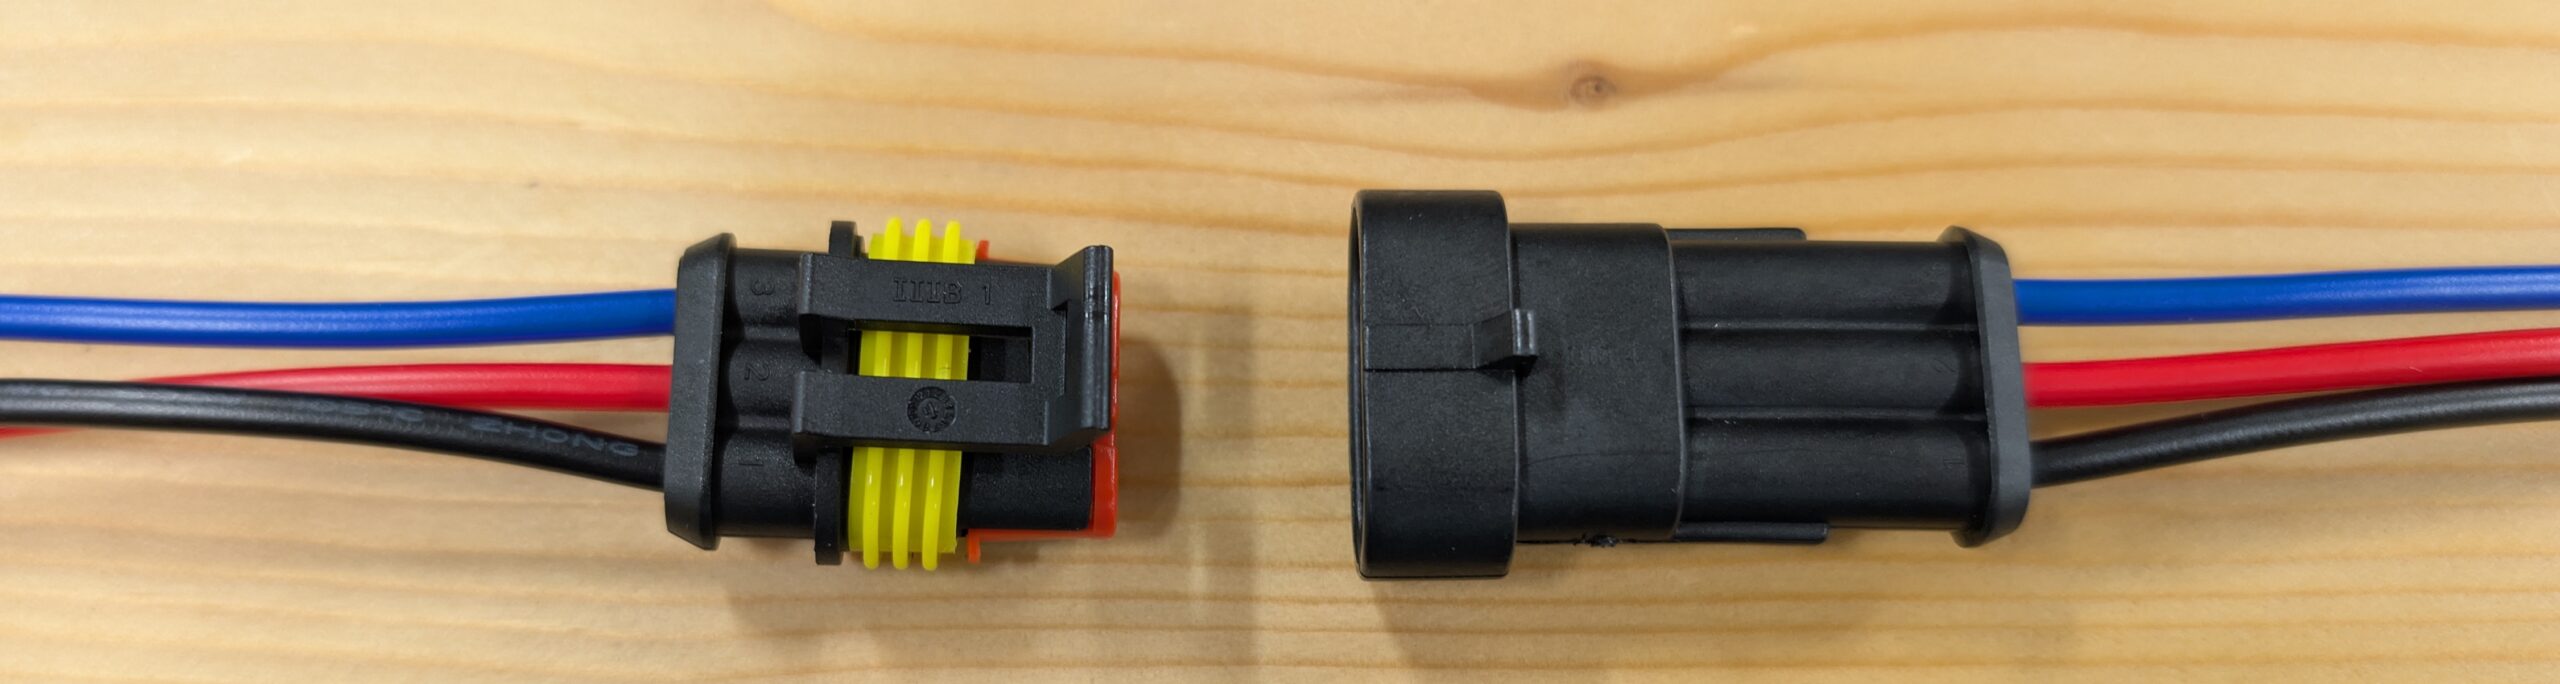
For the rotator control wire, I added a 3 pin waterproof automotive connector approximately 6ft below the rotator unit. I purchased connectors with pigtails already attached, so I needed to solder the control wires to the connectors. The other option is to buy the bare connectors and the proper crimping tool to make them yourself.
I also ran pre-cut lengths of guy rope through the mounting points on the rotator. I originally only had 2 long ropes with hardware, one for each side. I later realized that this only restricted bending in one direction. When I eventually took the antenna down to tune it (I talk about this later), I modified the guy ropes so that there were 4 independent ropes, each with their own hardware. This restricts the movement of the mast in all directions.
Installing the Antenna
Getting the antenna positioned on the roof was a 2 person job.
I found that my original plan of tilting the tripod to install the antenna mast wasn’t going to work. The antenna elements were too long and would have hit the side of my house when tilting the tripod up. The antenna and mast assembly was surprisingly light, so I had my helper hand the whole thing up to me on the roof. I then carried the assembly over and placed it in the tripod.
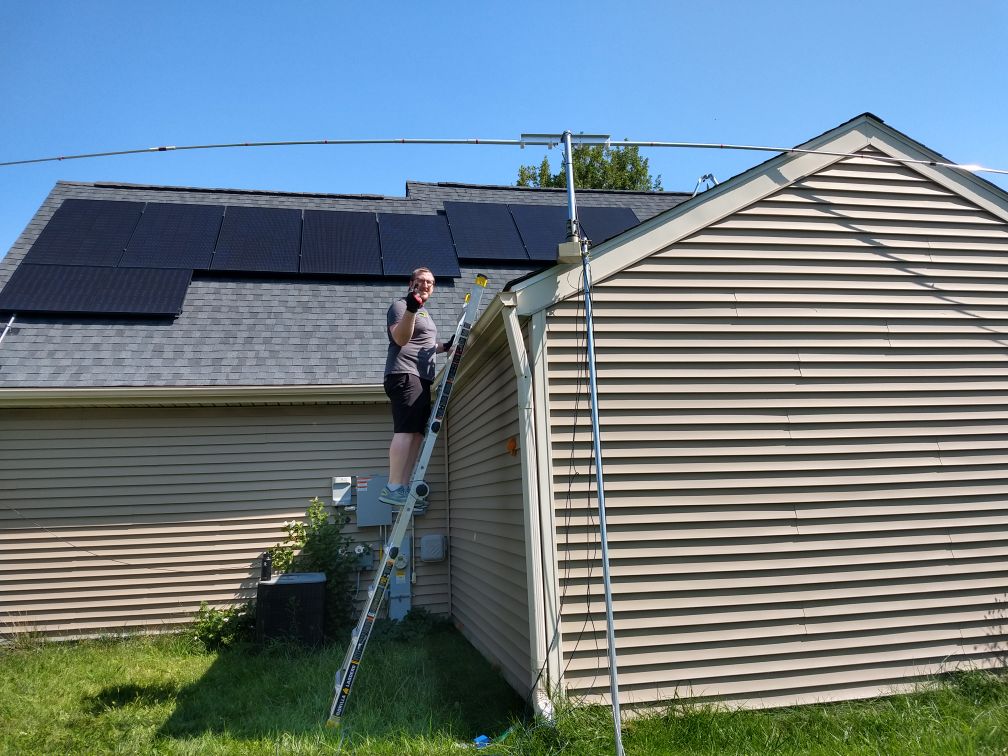
SAFETY NOTE: I highly suggest being tied-off in some capacity when carrying things on the roof.
After verifying that the tripod was straight and the antenna was pointing in the right direction (north), I secured the guy ropes to the anchor points with the proper hardware kits. I made sure to keep the guy rope tensioners near the bottom of the rope, so that I can adjust them from a ladder and not have to climb up onto the roof every time.
Next, I used cable ties to secure the feed line and rotator control line to the mast and tripod. I zip-tied the feed line and control cable to the closest guy line anchor to keep them from dragging on the shingles. I ran the 2 lines through the soffit into my attic, and then through the wall into my shack.
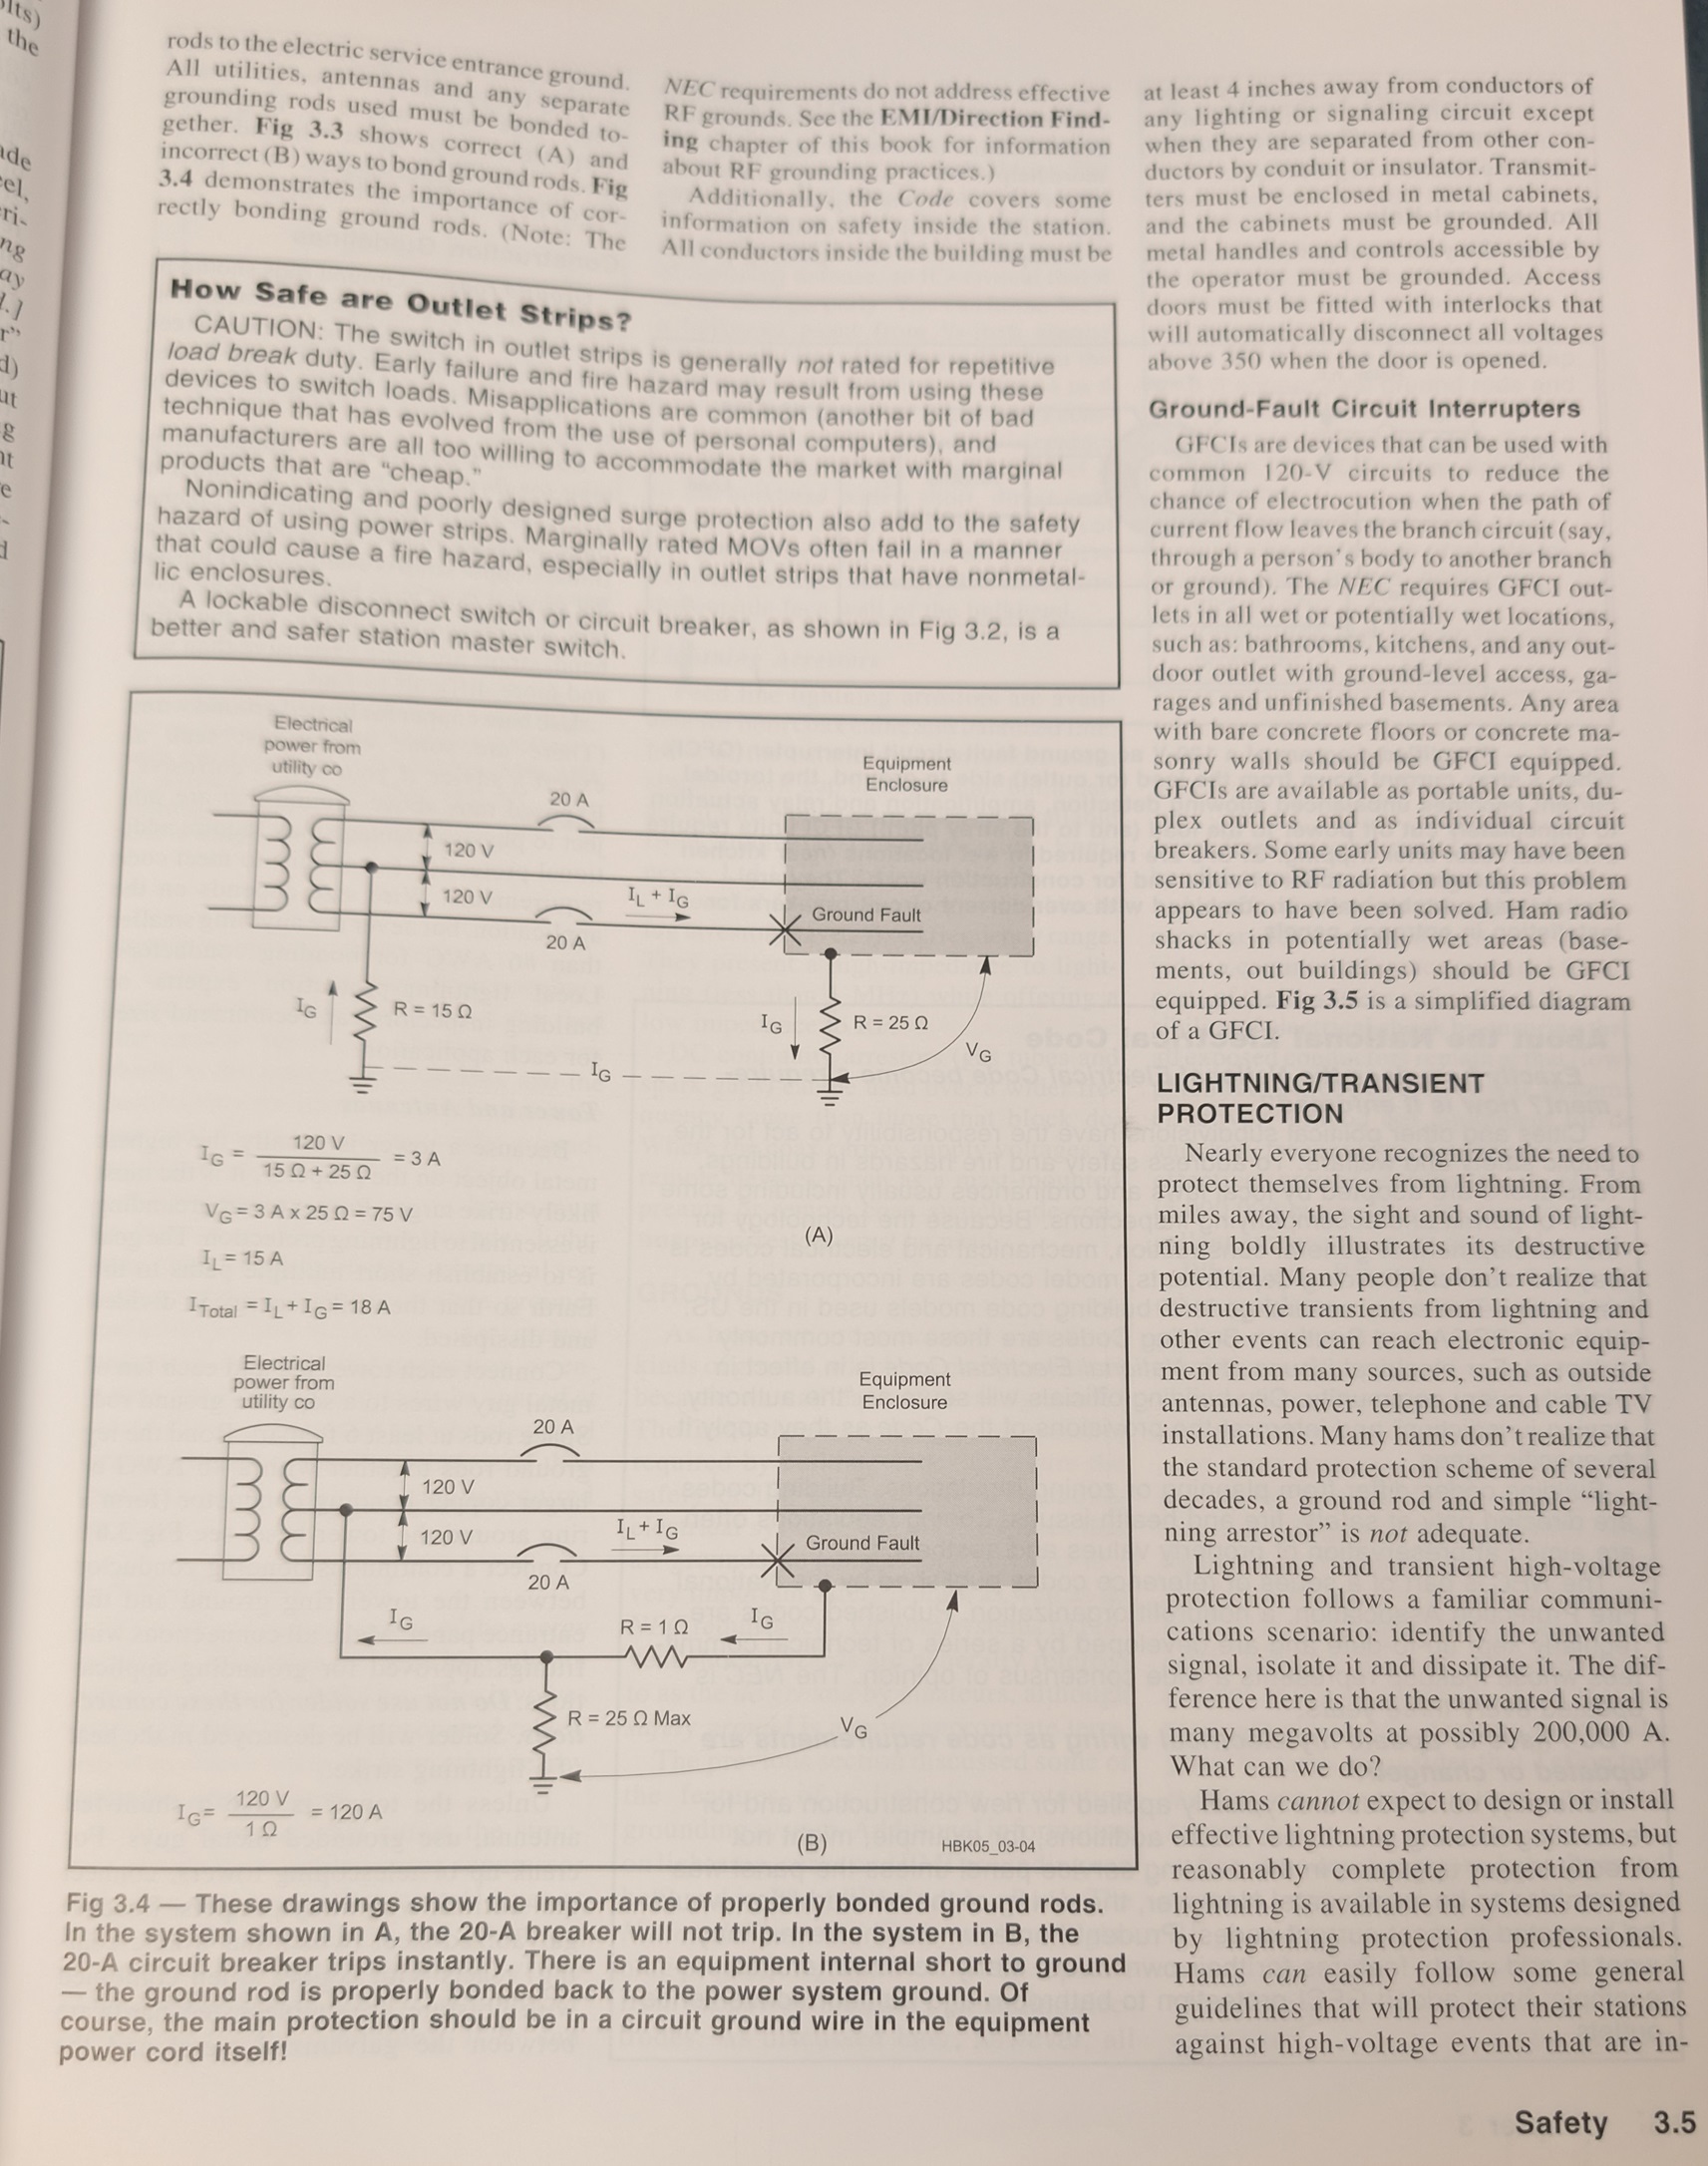
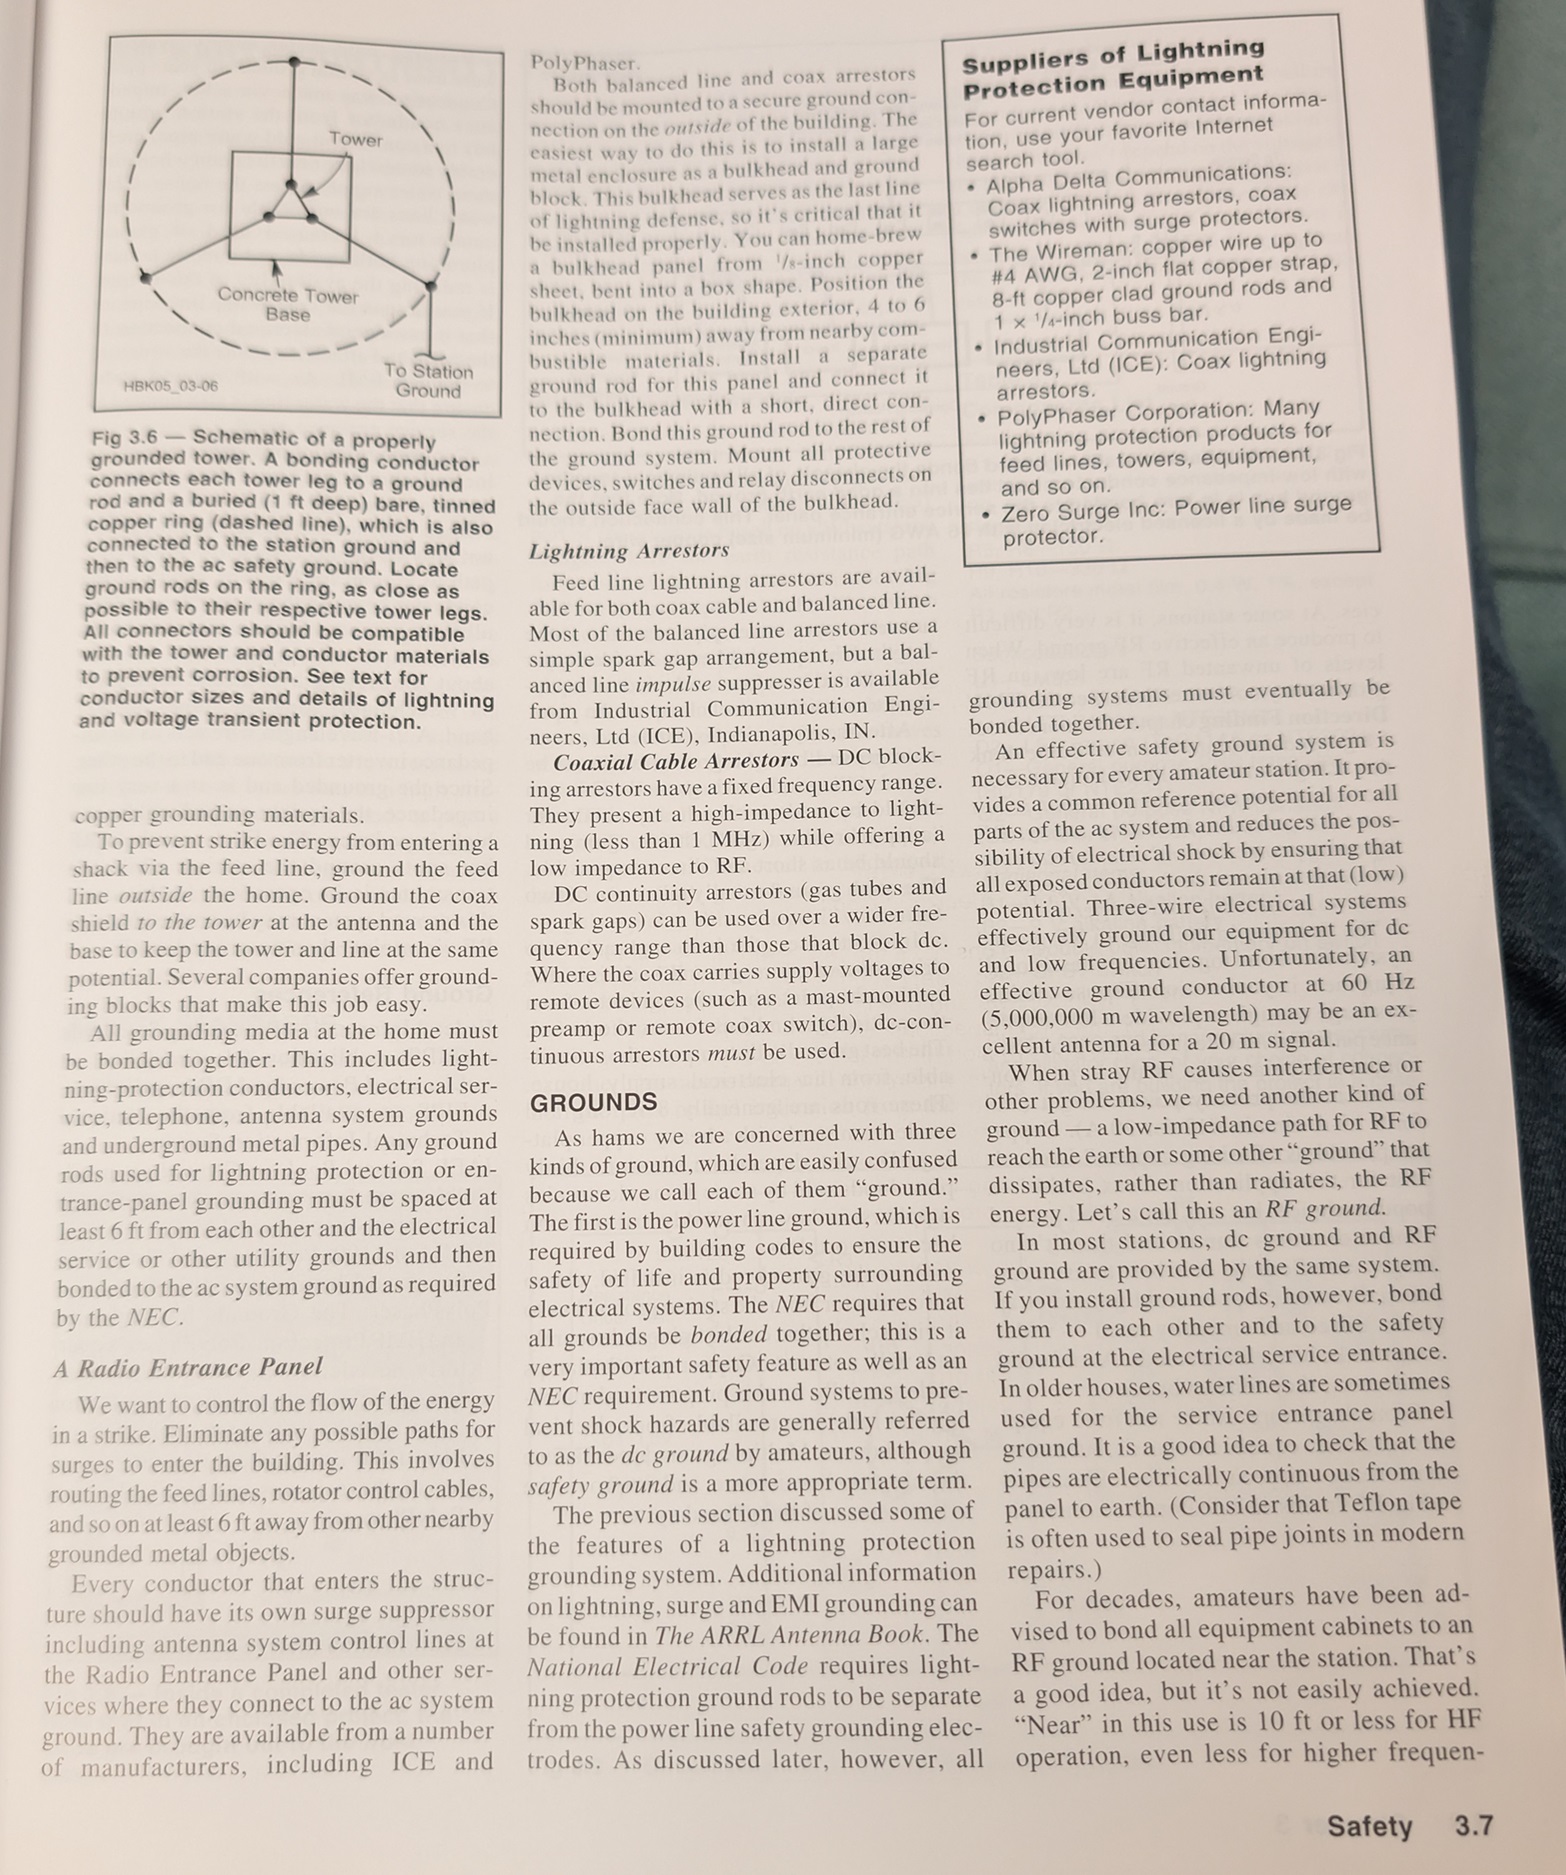
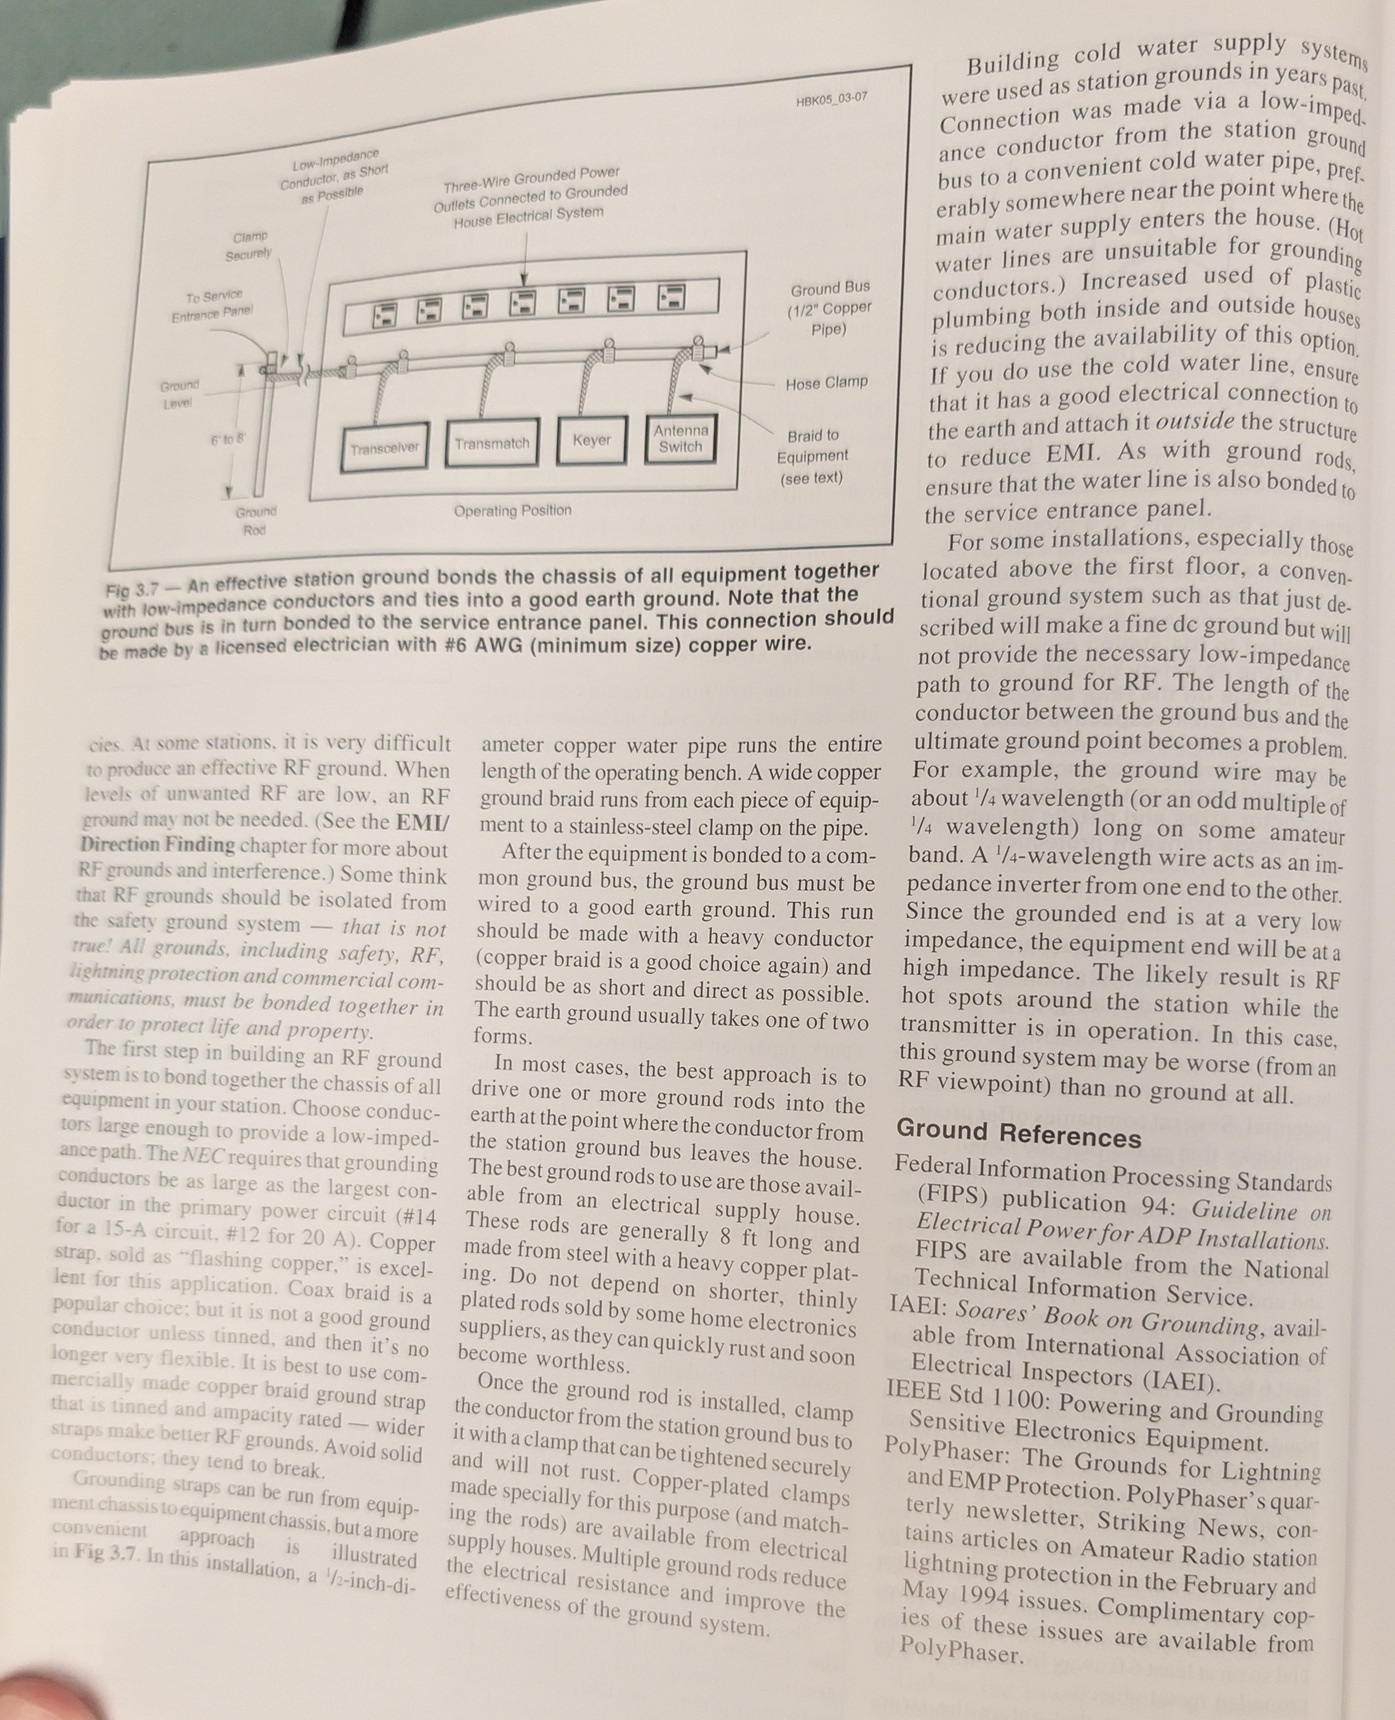
For grounding, I bonded a lightning arrester to the existing house grounding rod, as required by Illinois code. Below is a reference from the ARRL Handbook for Radio Communications (2007) on lightning protection and grounding.
Tuning and Operation.
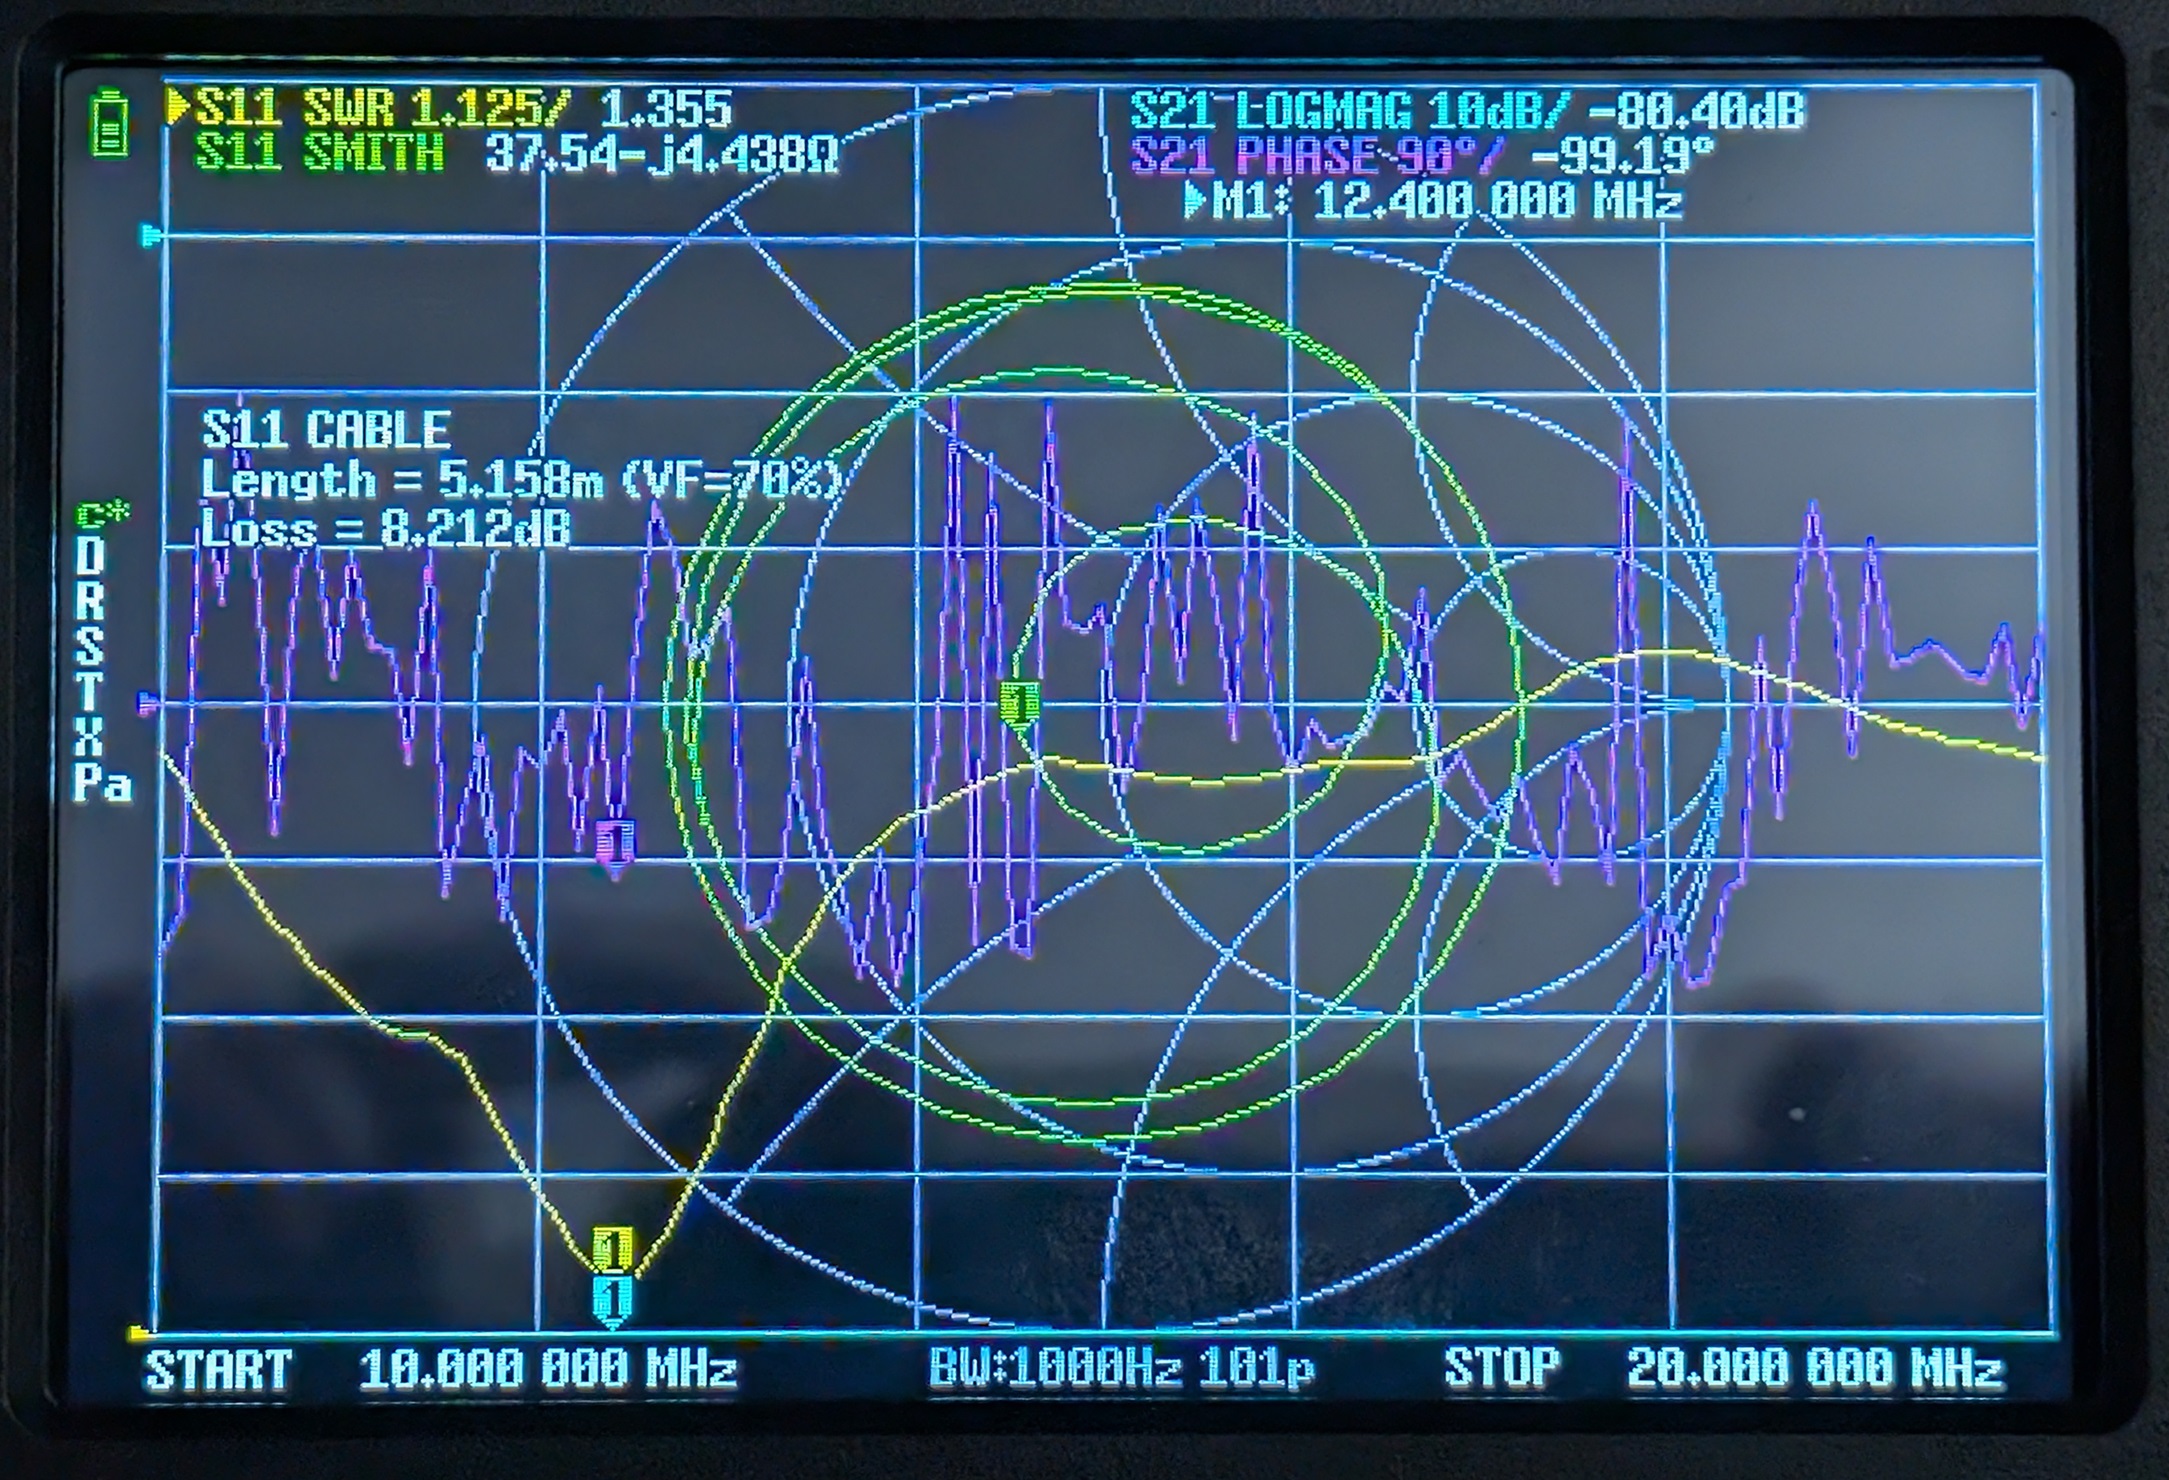
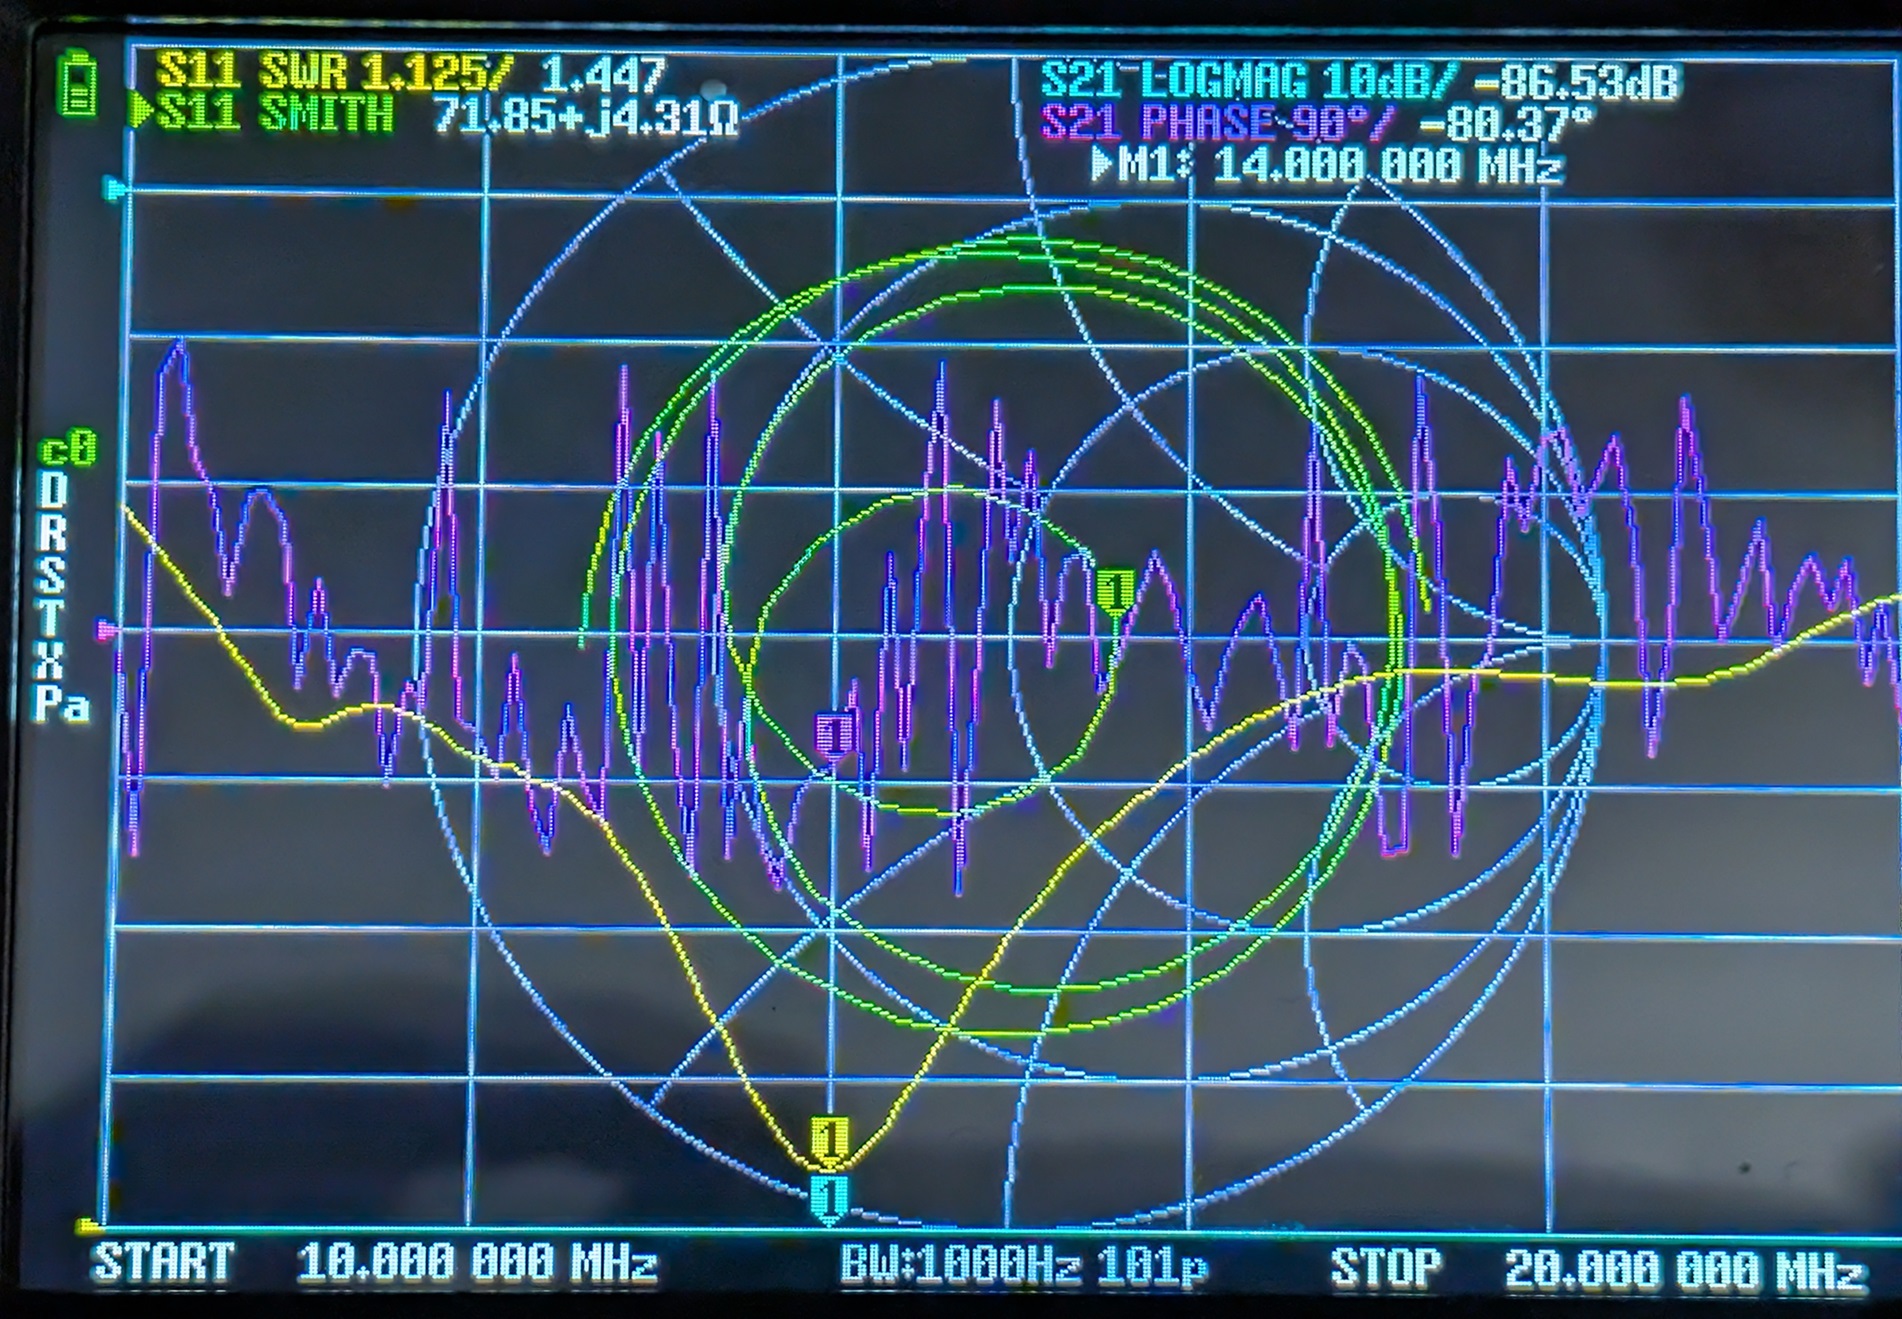
After fully installing the antenna, I jumped right into making contacts. I found that my Yaesu FT-710’s internal tuner only worked on the lower half of the 20m band (up to about 14.150 MHz). Putting the antenna on an analyzer, I figured out why.
The antenna SWR was centered around 12.400 MHz, too low for the 20m band. The SWR was too high on the upper part of the 20m band, outside of the operational range of the FT-710’s internal tuner (maximum 3:1). To increase the frequency, I needed to lower the wavelength, which meant physically shortening the antenna.
I had a friend help me lower the antenna back off the roof and shorten the antenna elements approximately 18 inches (46 cm) on each side. Standing the antenna back up in the middle of the yard, I grabbed my analyzer and checked SWR again. This time, the antenna was centered on to 14.000 MHz. After double checking that everything was snug, I lifted the antenna back onto the roof. Below are shots from the antenna analyzer before and after tuning.
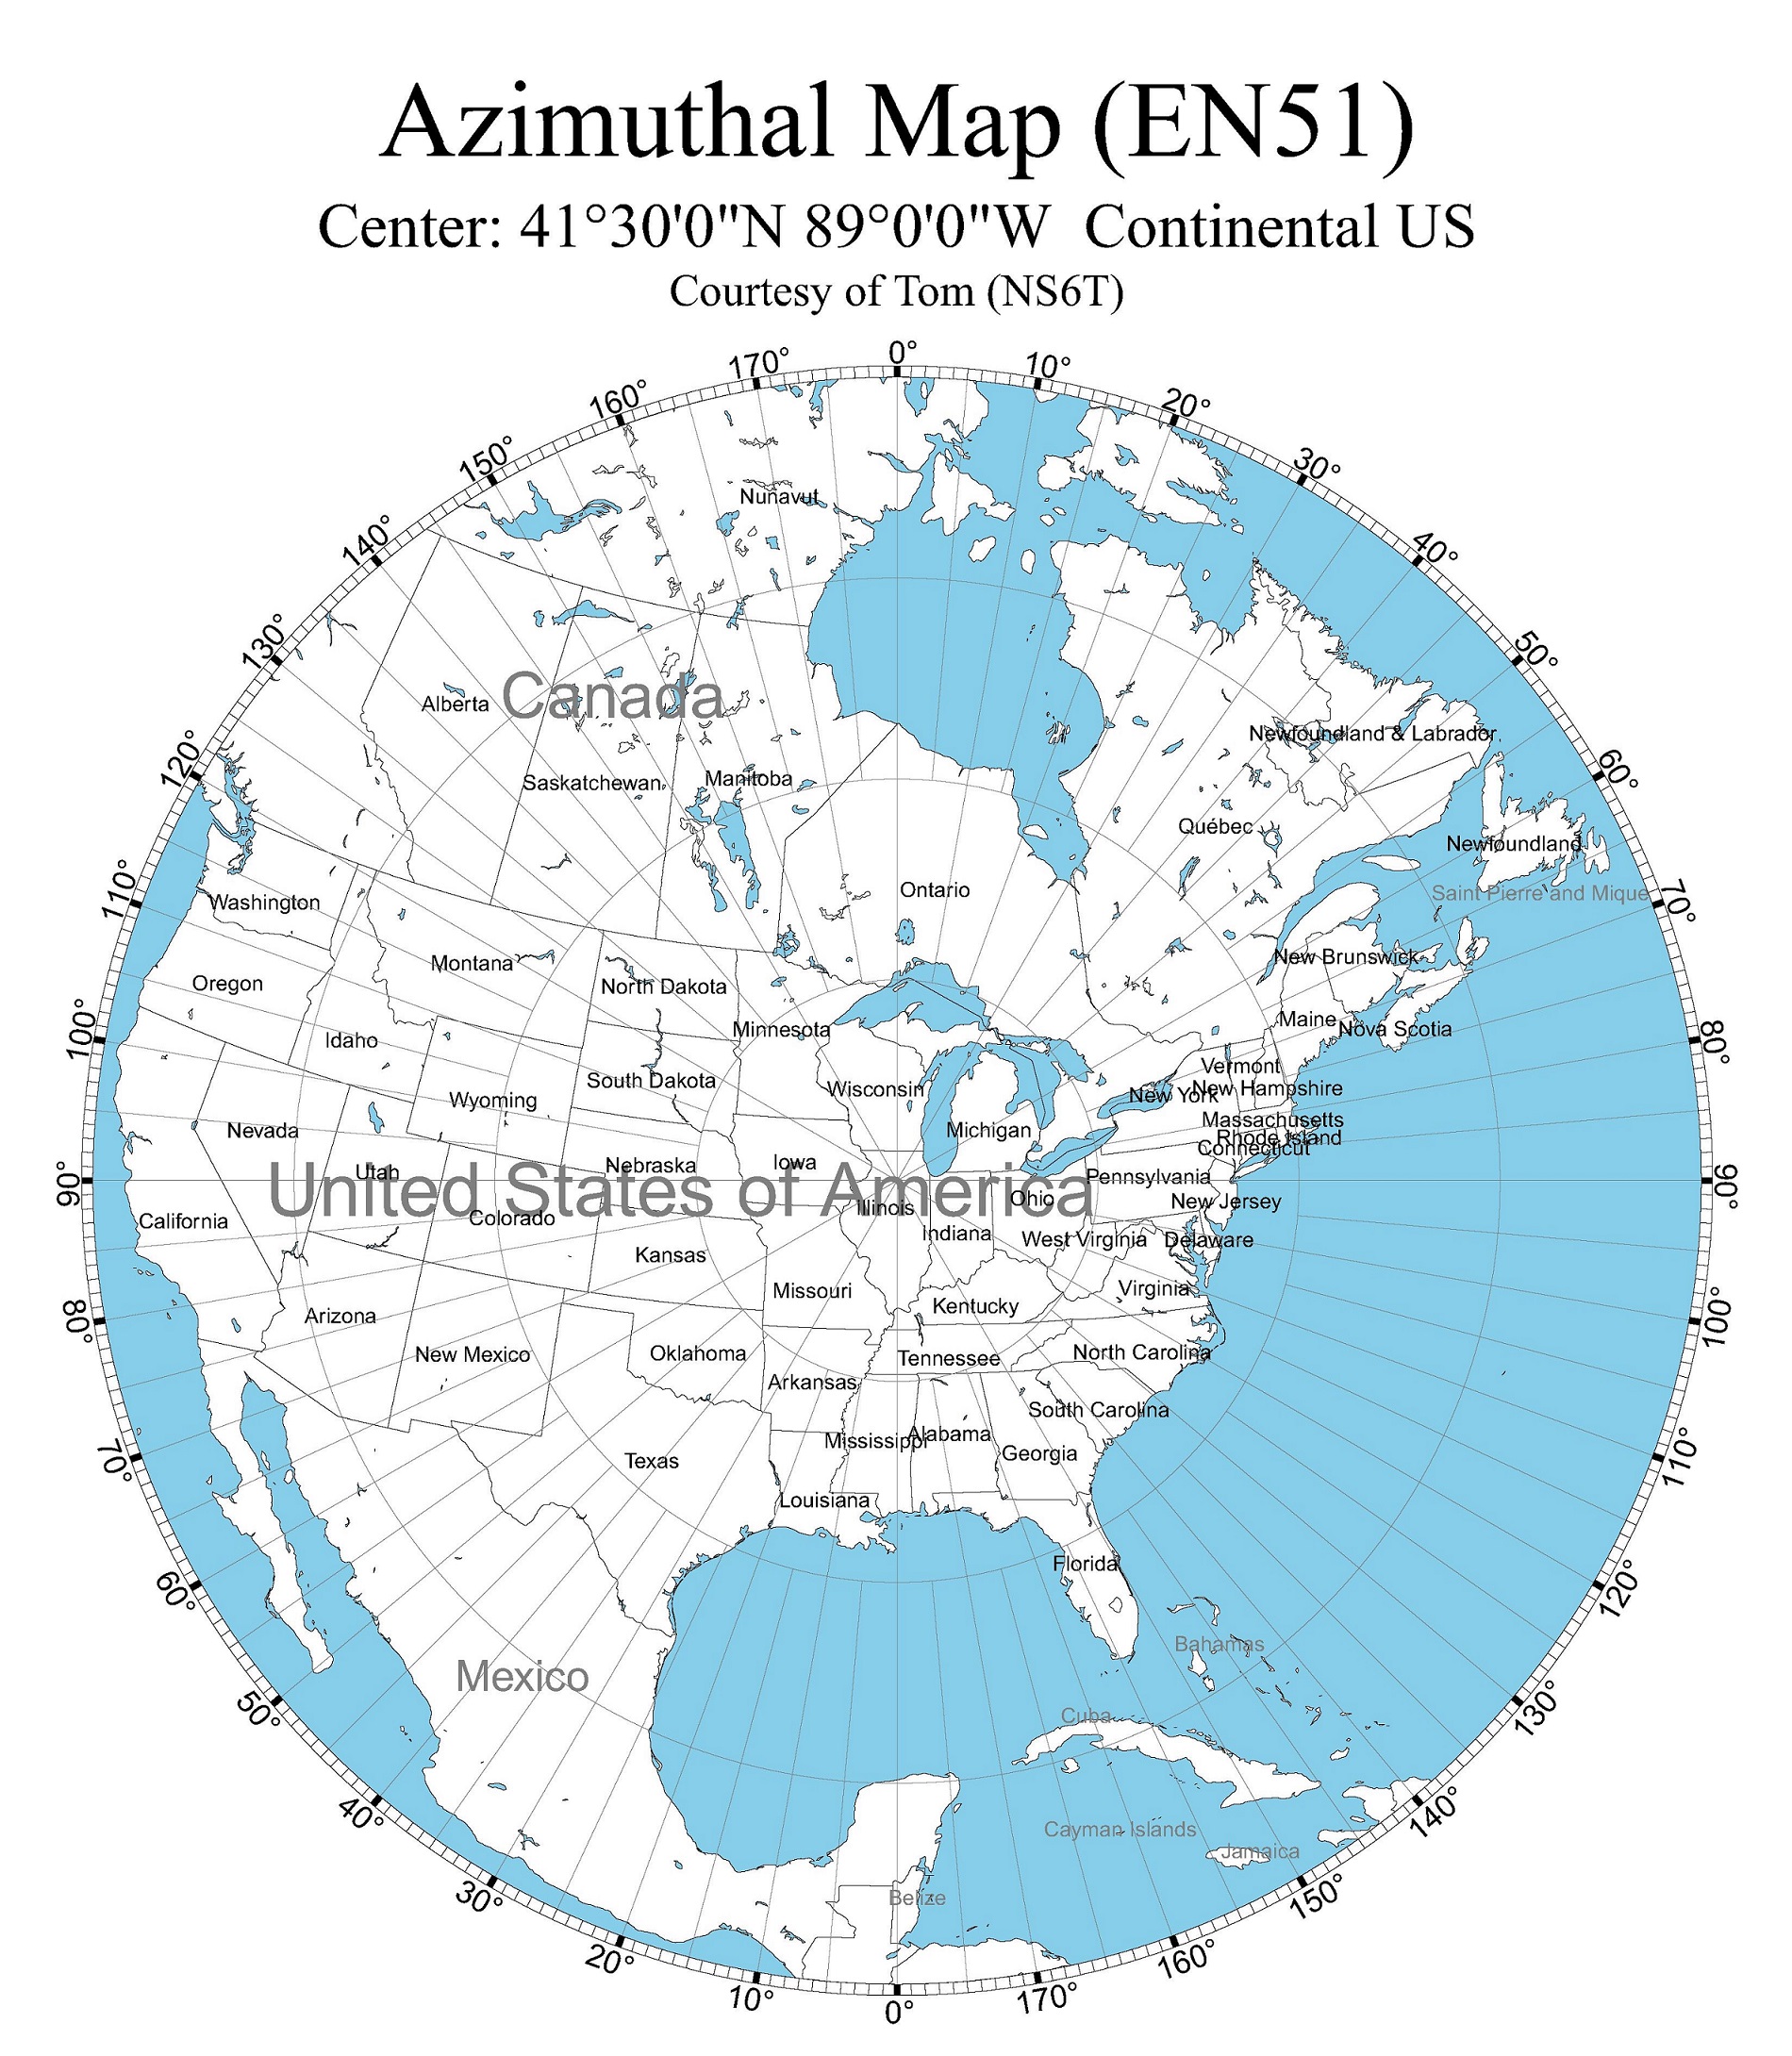
The rotator worked without fuss. 0 degrees points due north. With the antenna being bi-directional, I will never have to turn it past 180 degrees. Below is an edited azimuthal map from my location in EN51 (See https://ns6t.net/azimuth/azimuth.html). Note that all the positions past 180 degrees have been edited to reflect the bi-directional nature of the antenna.

Final Thoughts
Compared to installing a proper tower and a big multi-element yagi, the roof tripod solution is very cost effective.
Now, lets talk maintenance. One thing I am expecting to have to do is touch up the roof sealant from time to time. I plan on doing an inspection of the roof seals every spring and fall. I will also periodically (every few weeks) check the tension on the guy ropes.
Links
- Dipole Antenna:
- Antenna: https://www.dxengineering.com/parts/DXA-DXM20
- Feed Line: https://www.dxengineering.com/parts/dxe-8xdx075
- Choke: https://www.dxengineering.com/parts/ldg-ru-1-1
- Lightning Arrester: https://www.dxengineering.com/parts/DMN-SP1000
- Lower Mast: https://www.homedepot.com/p/Everbilt-Chain-Link-Fence-1-3-8-in-Diameter-x-10-ft-Long-17-Gauge-Thick-Galvanized-Steel-Top-Rail-Post-328913DPTEB/312373065
- Upper Mast: https://www.homedepot.com/p/Everbilt-1-5-8-in-Dia-x-6-ft-16-Gauge-Galvanized-Steel-Chain-Link-Fence-Line-Post-328921DPTSEB/312373050
- Guy Line Hardware:
- Guy Rope: https://www.dxengineering.com/parts/msg-mp04100
- Hardware Kit: https://www.dxengineering.com/parts/dxe-msg4-5m-t1
- Rotator:
- Rotator Combo Unit: https://www.newegg.com/philips-sdw1850-17/p/N82E16882641315?srsltid=AfmBOorh7MRz0AL8OZYcugpxj-KIb3NBRMj6a08JXNuyHDdcydaDYjzk
- Control Wire: https://www.homedepot.com/p/Syston-Cable-Technology-100-ft-18-3-White-CMP-FPLP-CL3P-Plenum-Rated-Stranded-Shielded-Bare-Copper-Security-Alarm-Control-Sound-Wire-5628-SB-WH-100/331183970
- Control Wire Connectors: https://www.amazon.com/dp/B0B615GJJ4?ref=ppx_yo2ov_dt_b_fed_asin_title&th=1
- Azimuthal Map: